

 HANDS ON SharePoint
 HANDS ON Teams
 HANDS ON Lists
 HANDS ON tek
 M365 Admin
Build a SharePoint Project Index for a Cleaner, Connected Intranet
If you work in consulting, or any environment where multiple projects run in parallel, you’ve probably felt this pain: every project gets its own SharePoint site, every team stores documents in different places, and every time someone asks, “Where can I find the project site for X?” you either open Teams to search for links or end up adding another item to the Quick Links web part.
In this article I’ll show you a simple saolution to create a clean, visual, centralized index of all project sites using one SharePoint list and one formatted view.

Why You Need a Project Index
When projects start multiplying, two things happen:
- Nobody knows where anything is
Projects live in their own site collections, but that makes discoverability a challenge. - Navigation doesn’t scale
You either ask someone to update the global navigation every time a new project starts, or you manually manage Quick Links on an intranet page.
A central site that acts as an index, or even the hub for your project sites, solves both problems. It gives everyone:
- One place to browse all projects
- An overview of who the customers is, what the project is about, and the current status
- A consistent pattern for storing and discovering project information
And most importantly: it eliminates the need to touch navigation again.
How Do You Create a SharePoint Project Index
Step 1 — Create a Site Collection Dedicated to Projects
Start by creating a new SharePoint site collection that will serve as your Projects Home.
This site will:
- Host the index list
- Act as the hub (optional but recommended)
- Provide a landing page to showcase all open and closed projects
This becomes the front door to your portfolio.
Step 2 — Create the “Projects” List
Inside your new site, create a standard list named Projects and add the following columns:
| Name | Column type |
|---|---|
| Title | Single line of text |
| Description | Multiple lines of text |
| Banner | Image |
| Logo | Image |
| Link | Hyperling |
| Status | Choice (In Progress/Close) |
With this, you now have a single source of truth for your projects.
Step 3 — Create a Custom View for Your Index
By default, SharePoint offers a list/table view or a tile view, but neither feels like a proper project dashboard. For a landing page, you want something visually appealing, something like the Viva Connections Dashboard style.
Here’s what to do:
- Open the Projects list
- Go to Create new view
- Choose Gallery as a starting point (optional but easier)
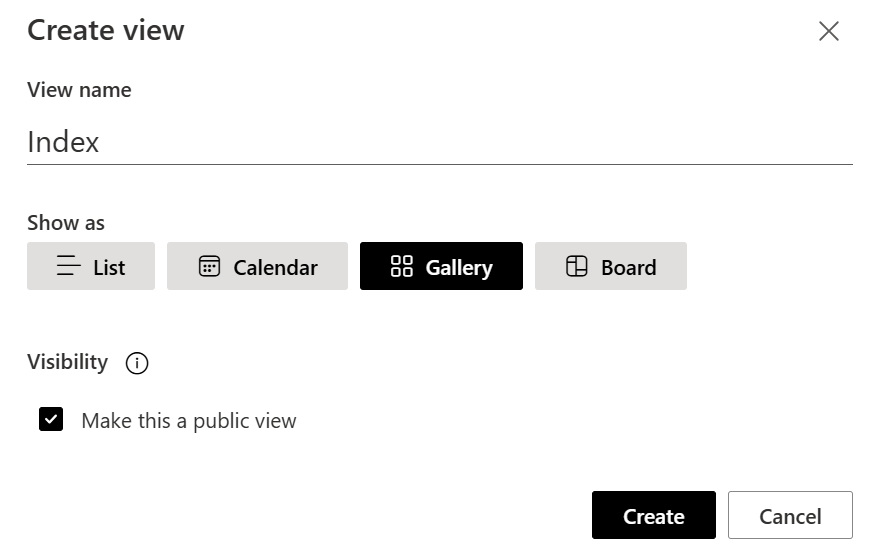
- Name your view; e.g., Dashboard View
- Save it
- Open Format current view
- Switch to Advanced mode
- Paste the custom JSON formatting below
{
  "$schema": "https://developer.microsoft.com/json-schemas/sp/v2/tile-formatting.schema.json",
  "height": 190,
  "width": 168,
  "hideSelection": true,
  "fillHorizontally": true,
  "formatter": {
    "elmType": "div",
    "attributes": {
      "class": "sp-card-container"
    },
    "children": [
      {
        "elmType": "a",
        "attributes": {
          "class": "sp-card-defaultClickButton",
          "role": "presentation",
          "href": "[$Link]"
        }
      },
      {
        "elmType": "div",
        "style": {
          "border-radius": "8px"
        },
        "attributes": {
          "class": "ms-bgColor-white sp-css-borderColor-neutralLight sp-card-borderHighlight sp-card-subContainer"
        },
        "children": [
          {
            "elmType": "div",
            "attributes": {
              "class": "sp-card-previewColumnContainer"
            },
            "children": [
              {
                "elmType": "div",
                "style": {
                  "height": "80px",
                  "overflow": "hidden",
                  "display": "=if ([$Banner] , 'block', 'none')"
                },
                "attributes": {
                  "class": "sp-card-imageContainer"
                },
                "children": [
                  {
                    "elmType": "div",
                    "style": {
                      "width": "100%",
                      "height": "auto"
                    },
                    "attributes": {
                      "class": "ms-bgColor-neutralLight sp-card-imagePreviewBackground"
                    },
                    "children": [
                      {
                        "elmType": "img",
                        "style": {
                          "width": "100%",
                          "height": "auto"
                        },
                        "attributes": {
                          "class": "sp-card-imagePreview",
                          "src": "=getThumbnailImage([$Banner], 300, 300)"
                        }
                      }
                    ]
                  }
                ]
              }
            ]
          },
          {
            "elmType": "div",
            "style": {
              "margin": "=if ([$Banner] , '8px 12px 0px 12px', '-2px 12px 8px 12px')",
              "display": "inline-block"
            },
            "attributes": {
              "class": "sp-card-displayColumnContainer"
            },
            "children": [
              {
                "elmType": "img",
                "style": {
                  "width": "20px",
                  "height": "20px",
                  "margin-right": "8px"
                },
                "attributes": {
                  "class": "sp-card-imagePreview",
                  "src": "=getThumbnailImage([$Logo], 300, 300)"
                }
              },
              {
                "elmType": "span",
                "style": {
                  "display": "inline-block",
                  "font-size": "13px",
                  "line-height": "20px",
                  "position": "absolute",
                  "max-width": "98px",
                  "overflow": "hidden",
                  "text-overflow": "ellipsis",
                  "white-space": "nowrap"
                },
                "attributes": {
                  "title": "[$Title]",
                  "role": "heading",
                  "aria-level": "3"
                },
                "txtContent": "=if ([$Title] == '', '–', [$Title])"
              }
            ]
          },
          {
            "elmType": "div",
            "style": {
              "margin": "0px 12px 2px 12px",
              "display": "inline-block"
            },
            "attributes": {
              "class": "sp-card-displayColumnContainer"
            },
            "children": [
              {
                "elmType": "span",
                "style": {
                  "font-size": "14px",
                  "font-weight": "600",
                  "max-width": "136px",
                  "overflow": "hidden",
                  "-webkit-line-clamp": "2",
                  "-webkit-box-orient": "vertical",
                  "display": "-webkit-box",
                  "word-break": "break-word",
                  "line-clamp": "2"
                },
                "attributes": {
                  "title": "[$Description]",
                  "role": "heading",
                  "aria-level": "3"
                },
                "txtContent": "[$Description]"
              }
            ]
          },
          {
            "elmType": "div",
            "style": {
              "margin": "0px 12px -8px 12px",
              "display": "inline-block"
            },
            "attributes": {
              "class": "sp-card-displayColumnContainer"
            },
            "children": [
              {
                "elmType": "div",
                "style": {
                  "width": "8px",
                  "height": "8px",
                  "border-radius": "50%",
                  "display": "inline-block",
                  "background-color": "=if([$Status]=='In Progress', 'green', '#db3a29')"
                }
              },
              {
                "elmType": "span",
                "style": {
                  "font-size": "12px",
                  "font-weight": "200",
                  "margin-left": "5px"
                },
                "attributes": {
                  "title": "[$Status]",
                  "role": "heading",
                  "aria-level": "3"
                },
                "txtContent": "[$Status]"
              }
            ]
          }
        ]
      }
    ]
  }
}
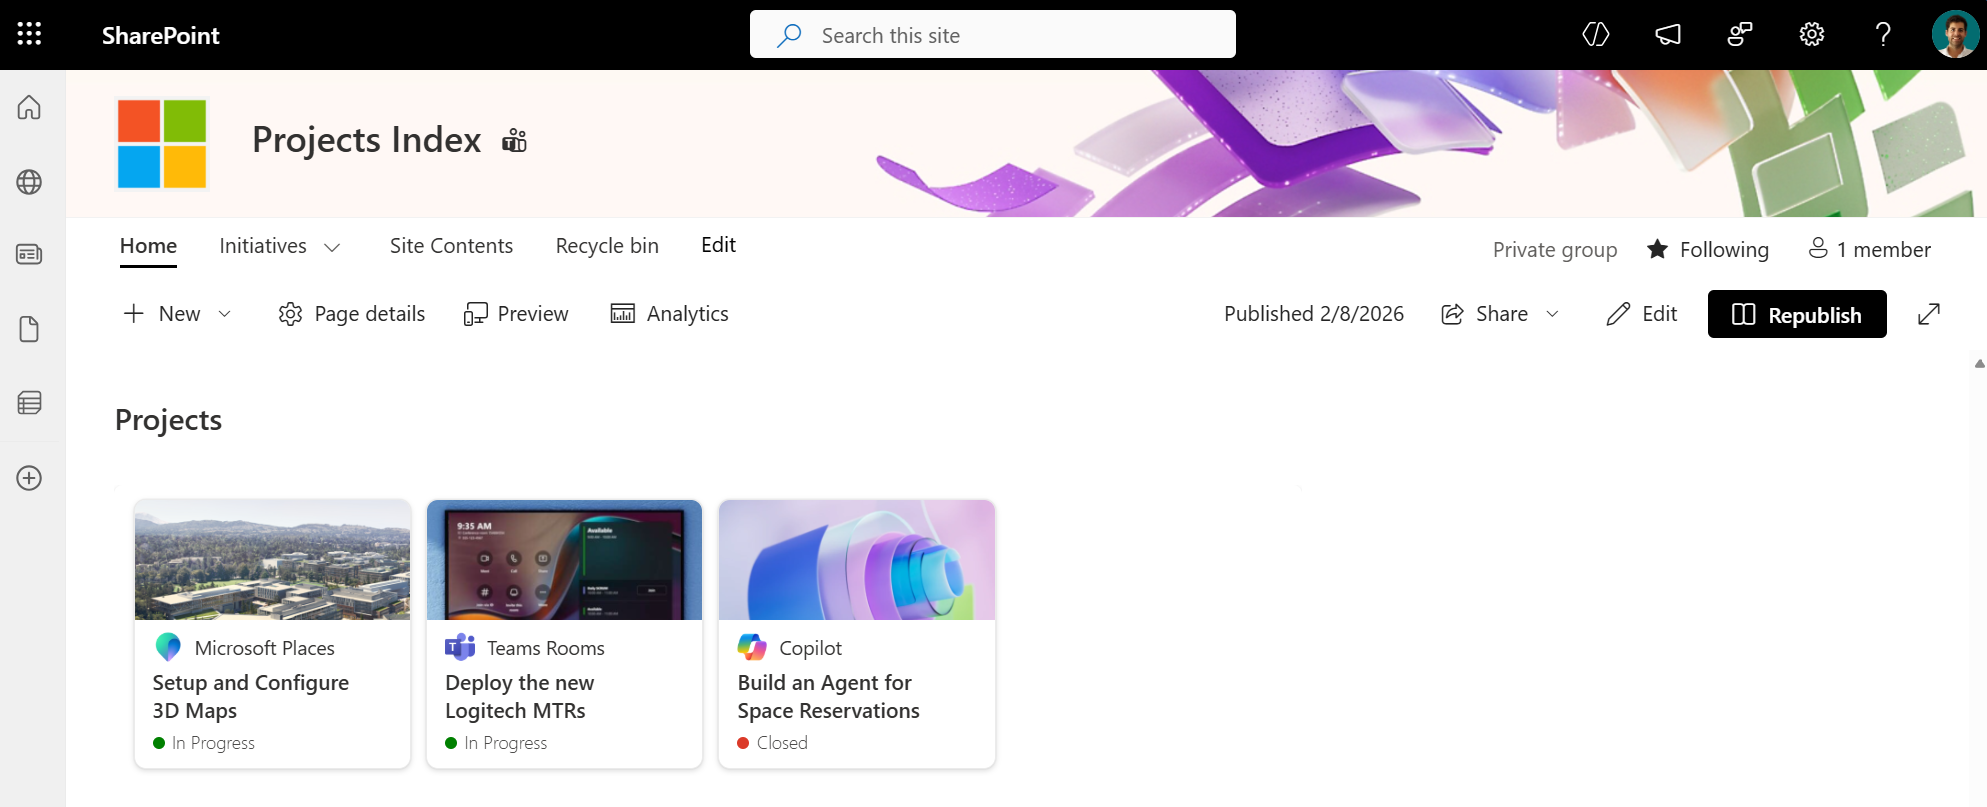
When you’re done, each project will appear as a card: logo, banner, name, status, and a clickable link; clean, modern, and ready for your projects site homepage.
Step 4 — Add the Formatted View to Your Landing Page
Now go back to the home page of the Projects site.
- Edit the page
- Add the List web part
- Select the Projects list
- Switch to the formatted view you just created
- In the web part settings, hide the command bar
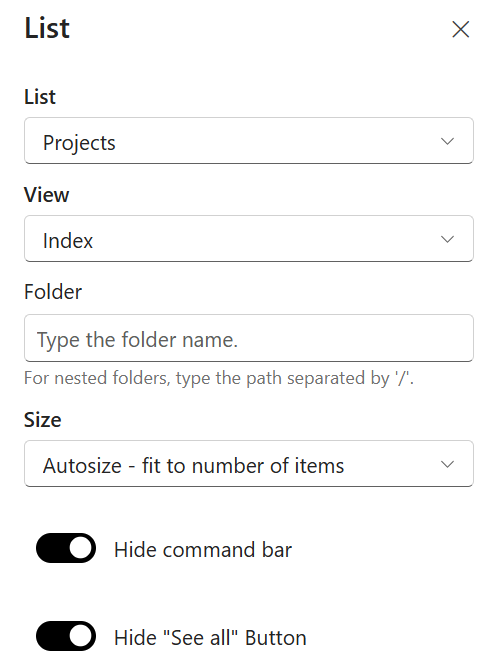
- Publish the page
Your project index is now complete. It looks good, scales well, and requires zero maintenance beyond adding or updating list items.
Keeping It Updated
From now on:
- When a new project starts, simply add a new item to the list
- When a project finishes, update its status
- If you use this as a hub, all project sites inherit global navigation automatically
It’s simple, repeatable, and a huge improvement over scattered links.
Final Thoughts
This type of solution is something many organizations overlook, yet it solves a real problem: discoverability. Whether you’re managing consulting projects, marketing campaigns, research initiatives, or internal teams, having a central place to see everything immediately is incredibly valuable.
Let me know, would you add something like this to your own intranet?
Or do you already have a different pattern for managing project visibility?


No comments yet