

 HANDS ON SharePoint
 HANDS ON Teams
 HANDS ON Lists
 HANDS ON tek
 M365 Admin
How to Enable SharePoint Skills in Public Preview
SharePoint Skills sit inside AI in SharePoint. Right now, both are public preview, so nothing shows up by accident. You only see them when your tenant (or specific sites) have been opted in and the right prerequisites are in place.
If you missed the “what are Skills and why should I care” piece, start here first: SharePoint Skills Was the Biggest Announcement at M365 Community Conference
This post is the practical one. What needs to be enabled, and how to avoid doing it the slow way.
Make sure AI in SharePoint is enabled
Skills depend on AI in SharePoint. So before you think about Skills, your admin needs to get AI in SharePoint working. Microsoft’s own checklist is here: AI in SharePoint get started.
- Users need a Microsoft 365 Copilot license.
- AI in SharePoint is off by default until a SharePoint Admin (or Global Admin) opts in using PowerShell.
- Preview is not available in GCC, GCC High, DoD, air-gapped clouds, or 21Vianet tenants.
- There’s also an optional setting around enabling Anthropic as a sub-processor for the full preview experience, with a fallback model when it isn’t enabled.
If AI in SharePoint is not available on the site, Skills won’t show up!
Skills have their own preview gate
Once AI in SharePoint is available, Skills still require an extra step.During public preview, site owners or admins must enable the Agent Assets feature at the site collection level. That feature creates the place where Skills live.
The manual path to enable Skills looks like this:
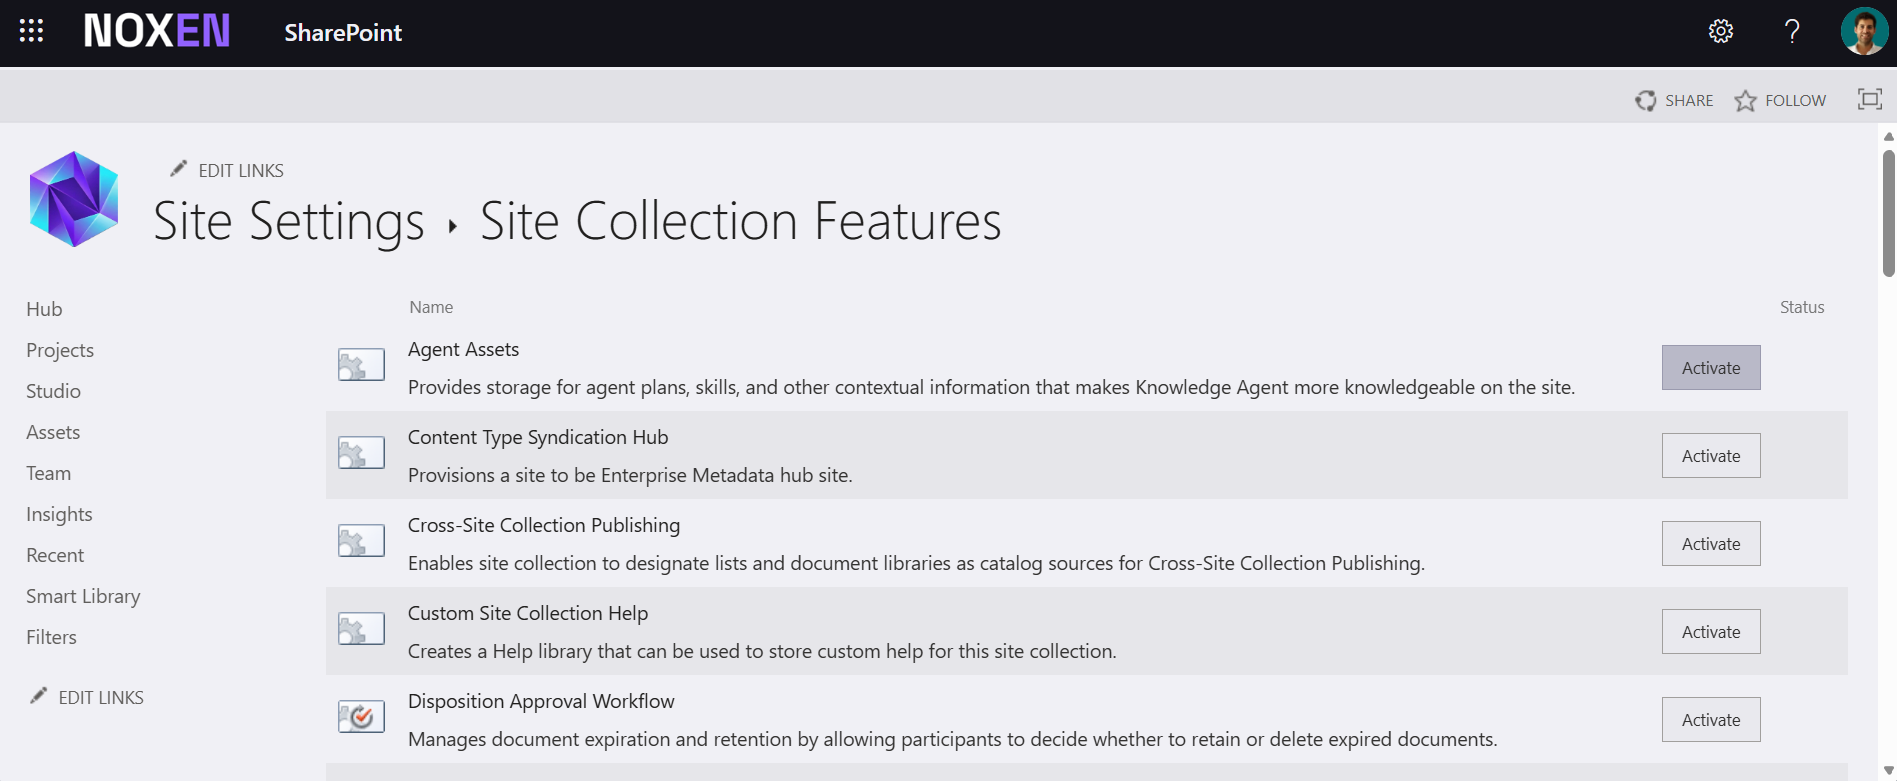
- Open the site and click the Settings gear.
- Open Site information, then click the View all site settings.
- From there, go to Site collection features.
- Find Agent Assets and activate it.
When Skills are enabled, an Agent Assets folder is created in the Site Assets library and each Skill is created as a Markdown file.
Enable SharePoint Skills in Bulk
If you only want Skills on one site, the manual approach is fine. If you want Skills across a department, a hub, or a portfolio of project sites, the manual approach becomes a time sink. You end up clicking through site settings for every single site collection, one by one.
To make this scalable, I put together a script that enables the Agent Assets feature in bulk.
What the PowerShell Script does
- Takes a list of site collection URLs
- Connects to each site using PnP PowerShell
- Enables or disables the Agent Assets site feature (same script, both directions)
- Produces a simple report at the end so you know what happened on every site
This is the feature being toggled:
- Feature name: Agent Assets
- Feature ID: 9e14d30c-1e0d-4c8c-8dcb-a8d29f7d4c15
How to run the PowerShell script
Before executing the PowerShell script make sure you have PnP PowerShell configured and you have the Application ID at hand you will need it to establish a connection.
You’ll pass the URLs as an array, tell it what you want to do (Enable or Disable), and provide your Entra App Client ID.
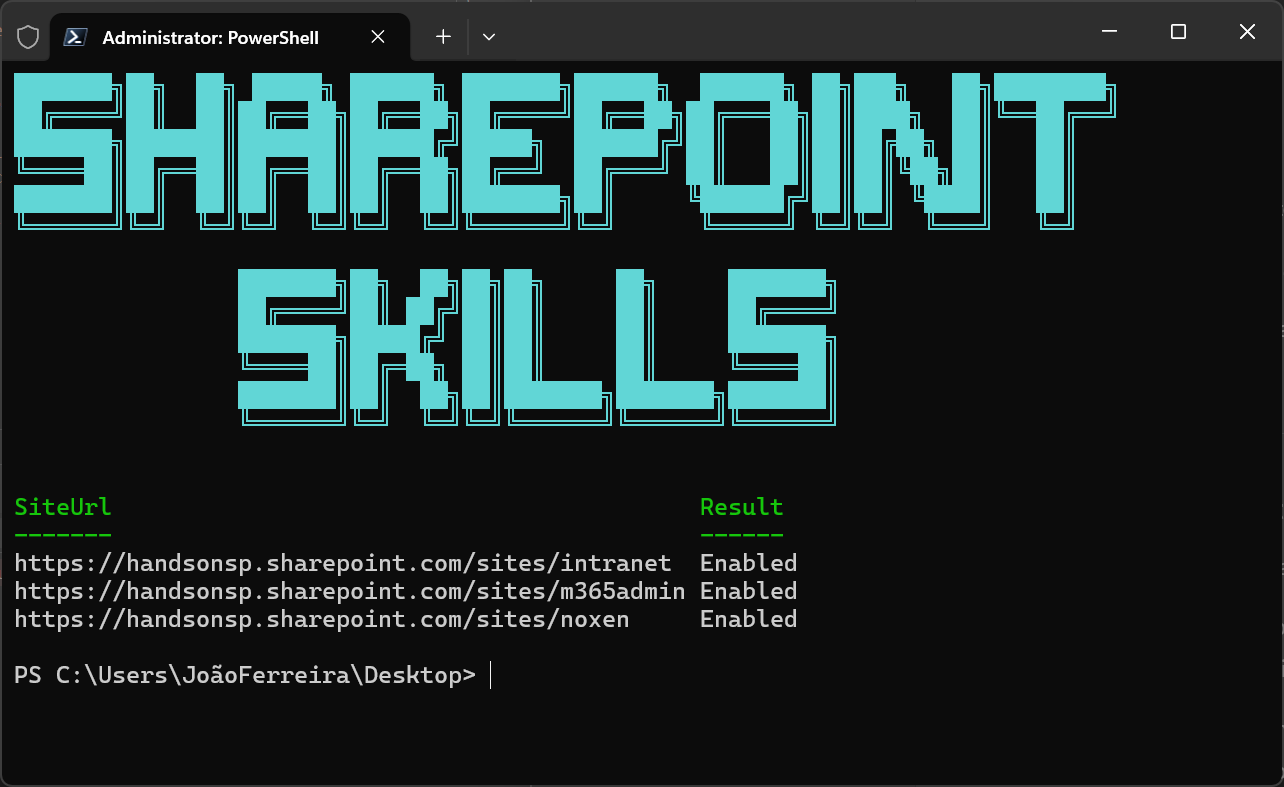
$sites = @(
  "https://contoso.sharepoint.com/sites/HR",
  "https://contoso.sharepoint.com/sites/Finance",
  "https://contoso.sharepoint.com/sites/Projects"
)

.\Enable-AgentAssets.ps1 -SiteUrls $sites -Action Enable -ClientId "00000000-0000-0000-0000-000000000000"
Parameters the script expects
- SiteUrls – Mandatory. An array of site collection URLs.
- Action – Mandatory. Either Enable or Disable.
- ClientId – Optional. If you don’t provide it, the script prompts once and reuses it for all sites.
- InteractiveLogin – Present in the script signature. Keep it if you plan to add an interactive auth branch later.
To use the script simply copy the code below into your own PS1 file and execute it.
param(
    [Parameter(Mandatory = $true)]
    [string[]]$SiteUrls,

    # If not provided, we prompt once (assume user enters correctly)
    [Parameter(Mandatory = $false)]
    $ClientId,

    [Parameter(Mandatory = $false)]
    [switch]$InteractiveLogin,

    [Parameter(Mandatory = $true)]
    [ValidateSet("Enable", "Disable")]
    [string]$Action
)

Clear-Host

Write-Host @'
███████╗██╗  ██╗ █████╗ ██████╗ ███████╗██████╗  ██████╗ ██╗███╗   ██╗████████╗
██╔════╝██║  ██║██╔══██╗██╔══██╗██╔════╝██╔══██╗██╔═══██╗██║████╗  ██║╚══██╔══╝
███████╗███████║███████║██████╔╝█████╗  ██████╔╝██║   ██║██║██╔██╗ ██║   ██║
╚════██║██╔══██║██╔══██║██╔══██╗██╔══╝  ██╔═══╝ ██║   ██║██║██║╚██╗██║   ██║
███████║██║  ██║██║  ██║██║  ██║███████╗██║     ╚██████╔╝██║██║ ╚████║   ██║
╚══════╝╚═╝  ╚═╝╚═╝  ╚═╝╚═╝  ╚═╝╚══════╝╚═╝      ╚═════╝ ╚═╝╚═╝  ╚═══╝   ╚═╝

                ███████╗██╗  ██╗██╗██╗     ██╗     ███████╗
                ██╔════╝██║ ██╔╝██║██║     ██║     ██╔════╝
                ███████╗█████╔╝ ██║██║     ██║     ███████╗
                ╚════██║██╔═██╗ ██║██║     ██║     ╚════██║
                ███████║██║  ██╗██║███████╗███████╗███████║
                ╚══════╝╚═╝  ╚═╝╚═╝╚══════╝╚══════╝╚══════╝
'@ -ForegroundColor Cyan

Write-Host ""
$FeatureId = [Guid]"9e14d30c-1e0d-4c8c-8dcb-a8d29f7d4c15"

function Write-Status {
    param(
        [string]$SiteUrl,
        [string]$Message,
        [ConsoleColor]$Color
    )
    Write-Host ("[{0}] {1}" -f $SiteUrl, $Message) -ForegroundColor $Color
}

if (-not (Get-Module -ListAvailable -Name PnP.PowerShell)) {
    throw "PnP.PowerShell module not found. Install it with: Install-Module PnP.PowerShell -Scope CurrentUser"
}

# Prompt once if not supplied
if (-not $ClientId) {
    $ClientId = Read-Host "Enter Entra App (Client) ID (GUID)"
}

$report = New-Object System.Collections.Generic.List[object]

foreach ($siteUrl in $SiteUrls) {
    try {

        Connect-PnPOnline -Url $siteUrl -ClientId $ClientId

        if ($Action -eq "Enable") {
            Enable-PnPFeature -Scope Site -Identity $FeatureId -Force
            $result = "Enabled"
        }
        else {
            Disable-PnPFeature -Scope Site -Identity $FeatureId -Force
            $result = "Disabled"
        }

        $report.Add([pscustomobject]@{
            SiteUrl = $siteUrl
            Result  = $result
        }) | Out-Null
    }
    catch {
        $report.Add([pscustomobject]@{
            SiteUrl = $siteUrl
            Result  = $_.Exception.Message
        }) | Out-Null
        continue
    }
}

$report | Sort-Object Result, SiteUrl | Format-Table -AutoSize
Next up on your SharePoint Skills Journey
Now that the prerequisites are handled, the real work starts.
In the next article I’ll walk through how to create a Skill and how to manage it directly from SharePoint, including where the Skill definition lives and what you can control without leaving the site.


No comments yet