How to effectively manage SharePoint news – Part 1
Modern SharePoint gives you the possibility to easily create News using the same interface you use to create Pages, it even includes the possibility to link to an external News post from your SharePoint and is displayed in the SharePoint home page and SharePoint news web parts as regular SharePoint news.
The creation process is very easy and efficient however managing the news could become difficult after a while.
If you have difficulties to find the news page you need to edit or publish let me tell you that you are not alone, this post will help you get straight to the location where the news are stored.

The problem with SharePoint news
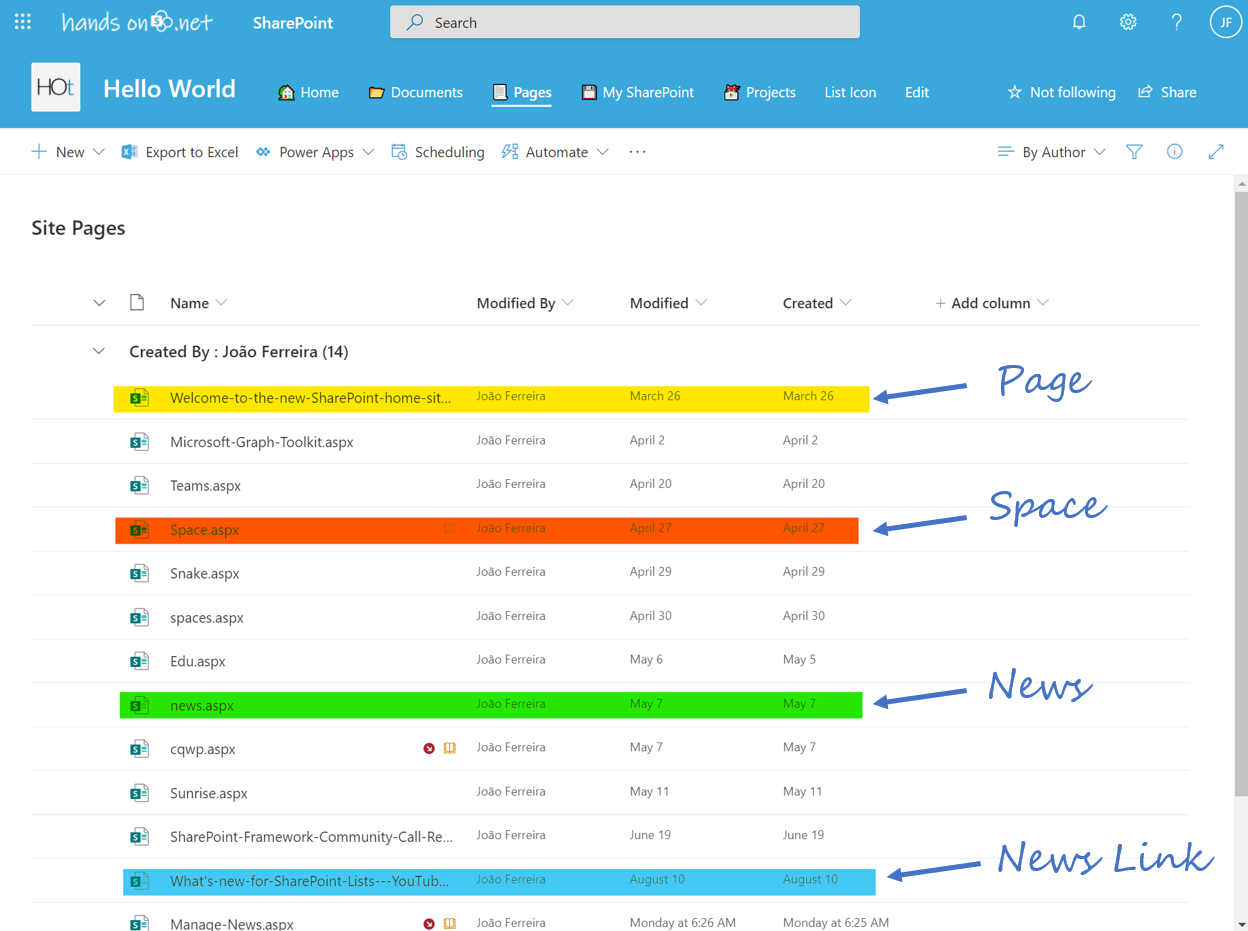
SharePoint stores the news in the Site Pages library along with all the other pages, you can easily end up with hundreds of pages in the library with no easy way to identify Pages, Spaces, News and News Links.
In the following image you can see a library with these 4 different page types with no visual information about what is a page and what is a news or news link.
The solution to easily manage SharePoint news
Even though SharePoint does not display this information it is stored in hidden fields in the library but sadly because they are not visible you are not able use them when creating new custom views from the user interface.
Before we jump into the creation of the custom views here is a list of the library fields, we will use to filter the news.
- Title – The title given to the page, this field can be different than the name of the page and helps to easily identify the news
- Name – The physical name of the page (aspx file)
- Editor – The person that has edited the page
- Modified – The date of the last modification
- Promoted State – The field that tells you if a page is a simple page or a news page
- 0 – Page
- 2 – News
- Page Layout Type – The page layout used by the page
- Article- Is used by SharePoint news
- RepostPage – Is used by the news link
- Original Source Url – The url to where the user is redirected by a news link
To create the custom views you will need to use PnP PowerShell, if you don’t have it installed you can download it from here.
Once you get it installed do the following:
- Open PowerShell
- Execute the following cmdlet to connect to the site collection where you want to add the extra views
Connect-PnPOnline -url https://contoso.sharepoint.com
- Introduce your credentials
- To create a view for All news execute the following cmdlet
Add-PnPView -List "Site Pages" -Title "All News" -Fields "Title", "Name", "Editor", "Modified" -Query "
2 - To create a view for SharePoint news execute the following cmdlet
Add-PnPView -List "Site Pages" -Title "SharePoint News" -Fields "Title", "Name", "Editor", "Modified" -Query "
2 Article - To create a view for the SharePoint news link execute the following cmdlet
Add-PnPView -List "Site Pages" -Title "News link" -Fields "Title", "Name", "Editor", "Modified", "_OriginalSourceUrl" -Query "
2 RepostPage
Note: If you want to apply this to multiple site collection you can download the createNewsViews script provided at the bottom of the article.
After executing this step open the Site Pages library and select your newly created views, to see the entire process watch the video below where I explain how to create the views and what is displayed in each one of them.

 HANDS ON tek
 M365 Admin







No comments yet