

 HANDS ON SharePoint
 HANDS ON Teams
 HANDS ON Lists
 HANDS ON tek
 M365 Admin
How to build a weather web part for SharePoint using a list view formatting
Modern SharePoint has a built-in weather web part but unfortunately it does not allow customizations displaying just the weather in black and white.
I was looking for a solution with a bit more color and similar with the weather tile from Windows, so I decided to build my own using a custom SharePoint list, a custom view formatting, Power Automate and the out of the box lists web part.
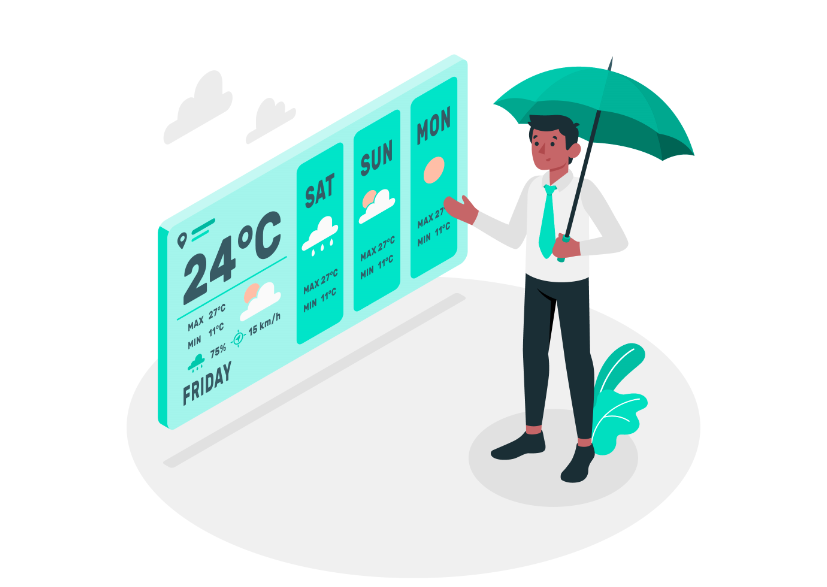
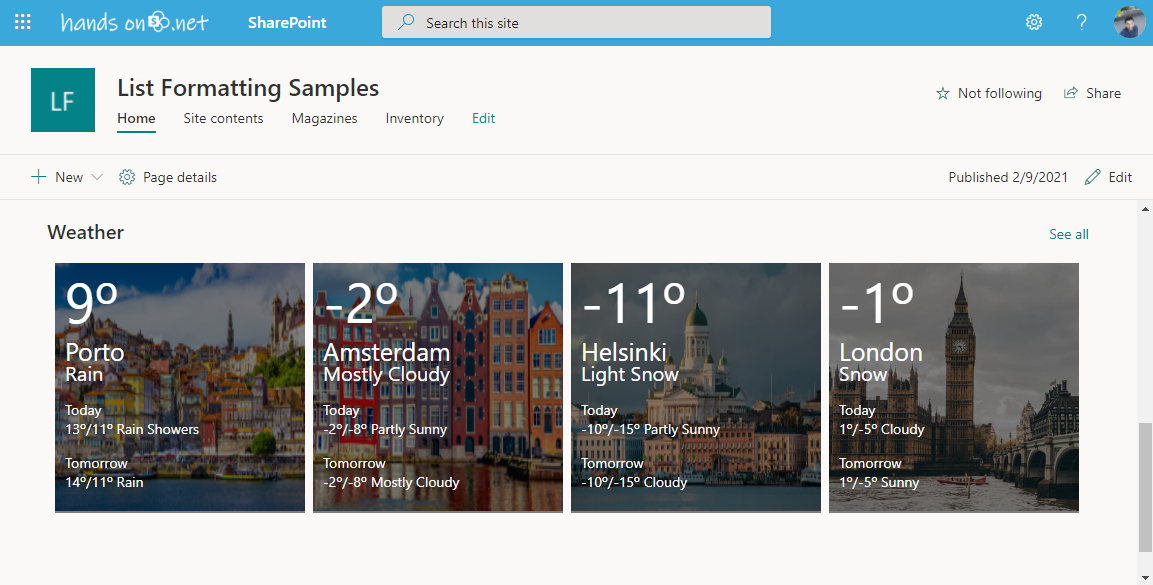
In this article you will find the detailed instructions to implement your own weather web part similar to the one shown in the image below.
Create the SharePoint list
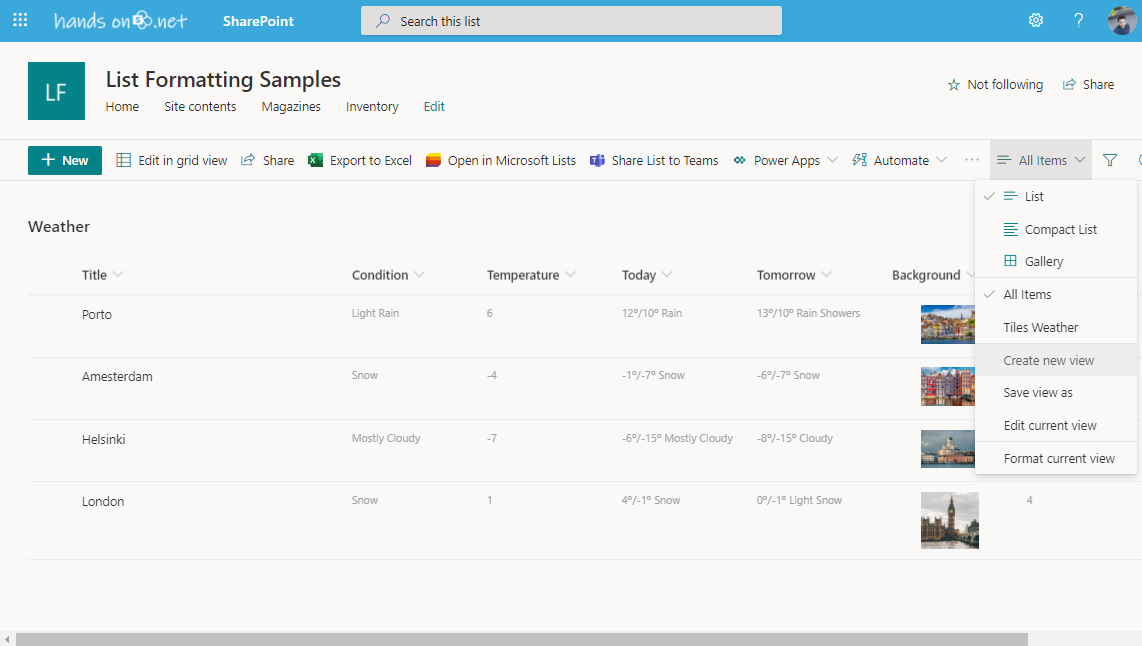
To host the temperature for each one of the locations you will need to create a SharePoint list with the following columns:
- Title – Used to store the name of the city
- Condition – Used to store the current condition
- Temperature – Used to store the current temperature
- Today – Used to store the max and min temperature and condition for the current day
- Tomorrow – Used to store the max and min temperature for the next day
- Background – Background image to be used in the tile
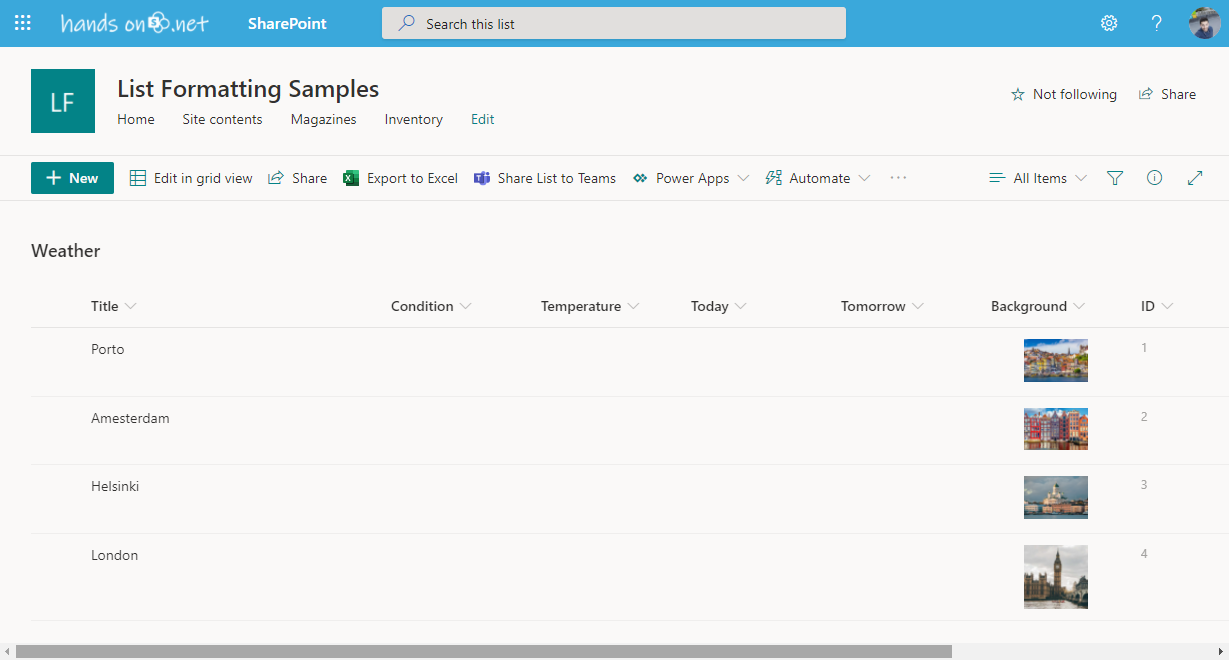
Once you get the list created, go to the list settings and edit the All Items view to make the ID column visible, this will be needed in flow definition in the Power Automate.
Add all the cities from where you want to get the weather by defining the name and the background image for the tile, once you end this process your list will look like the image below.
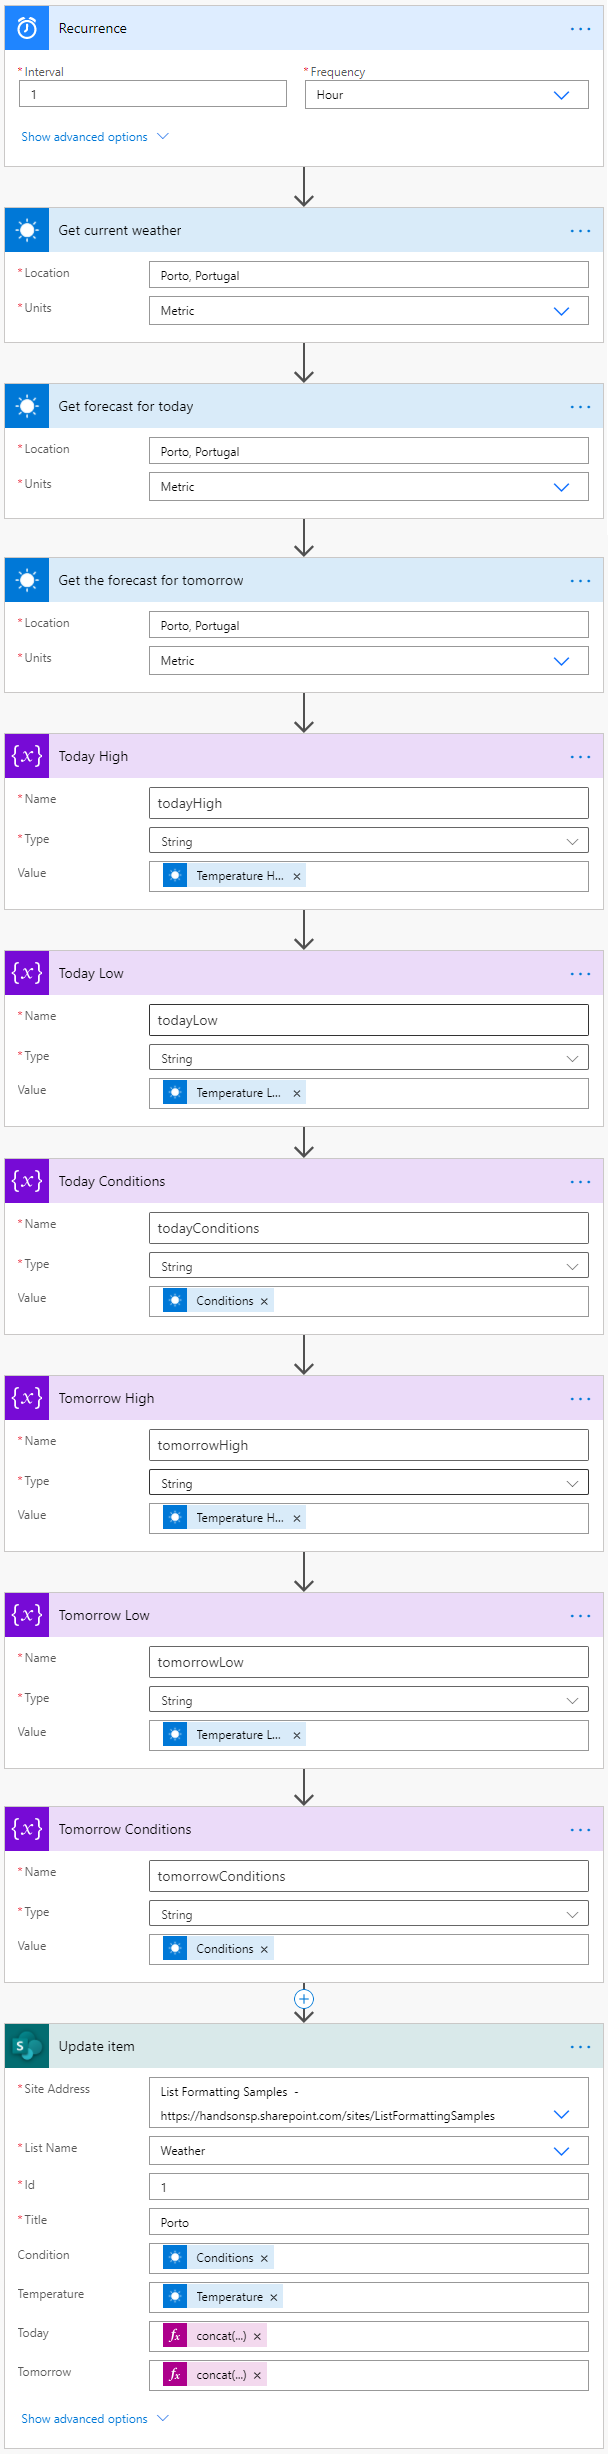
Create a Flow to get the Weather for each one of the cities
The magic behind this web part happens in a flow defined in Power Automate that is executed every hour to get the current temperature and conditions for each city.
To create the follow, you must do the following:
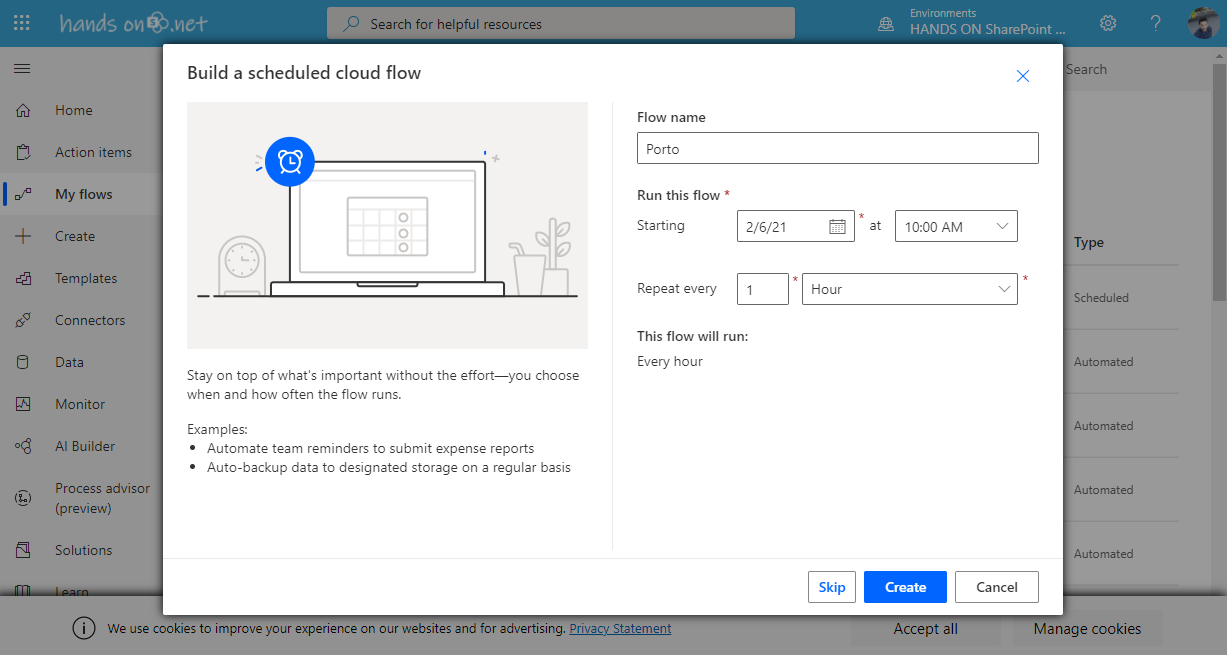
- Open Power Automate and create a new Scheduled automated flow
- Provide a name for the Flow, define the starting hour and define the recurrence for one hour
- Click the Create
- Add all the available actions for the MSN Weather
- Get current weather
- Get forecast for today
- Get forecast for tomorrow
- Define the city from where you want to get the weather
- Create 6 variable to store the information from the MSN weather actions
- Today High
- Today Low
- Today Conditions
- Tomorrow High
- Tomorrow Low
- Tomorrow Conditions
- Add the action Update Item from SharePoint, decided to use the update item as I’m not interested in keeping the history of the weather
- Provide the details for the site collection where your weather list is stored
- Provide the list name
- Provide the item id you want to update, with the modified view this ID should be visible now in your list
- Type the name of the City in the Title column
- Select conditions and temperature for the columns with the same names
- For today and tomorrow use a concat formula to concatenate the values for Today and Tomorrow as shown in the following example
concat(variables('todayHigh'),'º/',variables('todayLow'),'º ',variables('todayConditions')) - Click Save
In the image below you can see the flow with all the actions definitions, repeat the process for each one of the cities you want to get in the web part.
Format the SharePoint list view
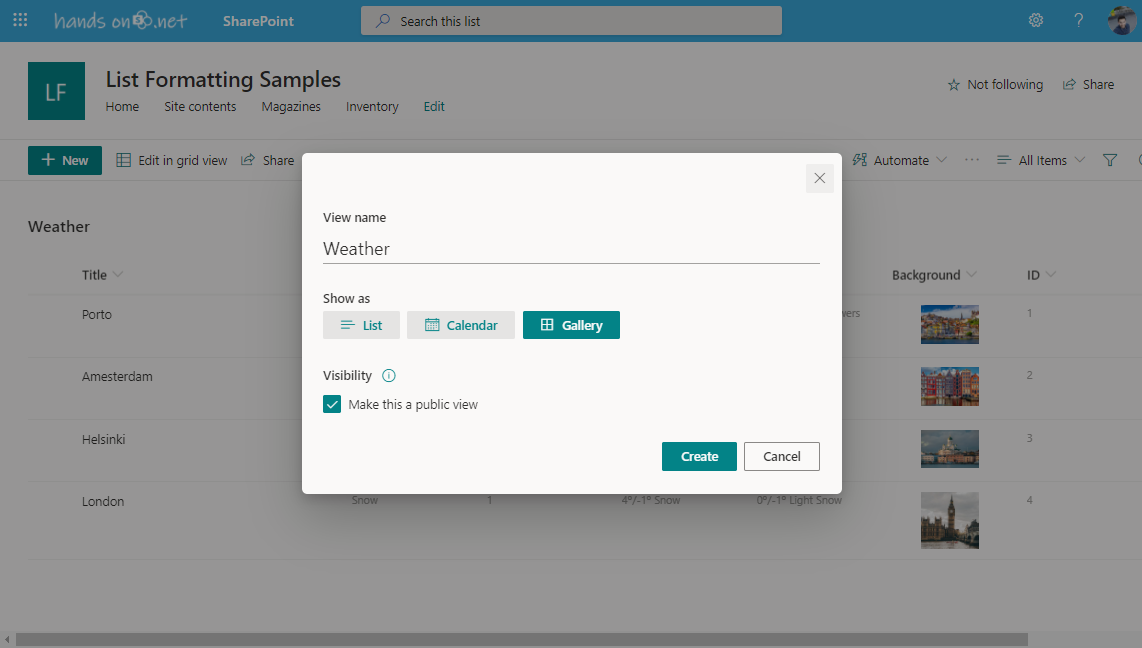
In order to see the information in the list as a tile format you must format the List view to be displayed as tiles, to do it do the following:
- Open the view selector menu and click on Create new view
- Provide a view name, select gallery, and check the option to make this a public view
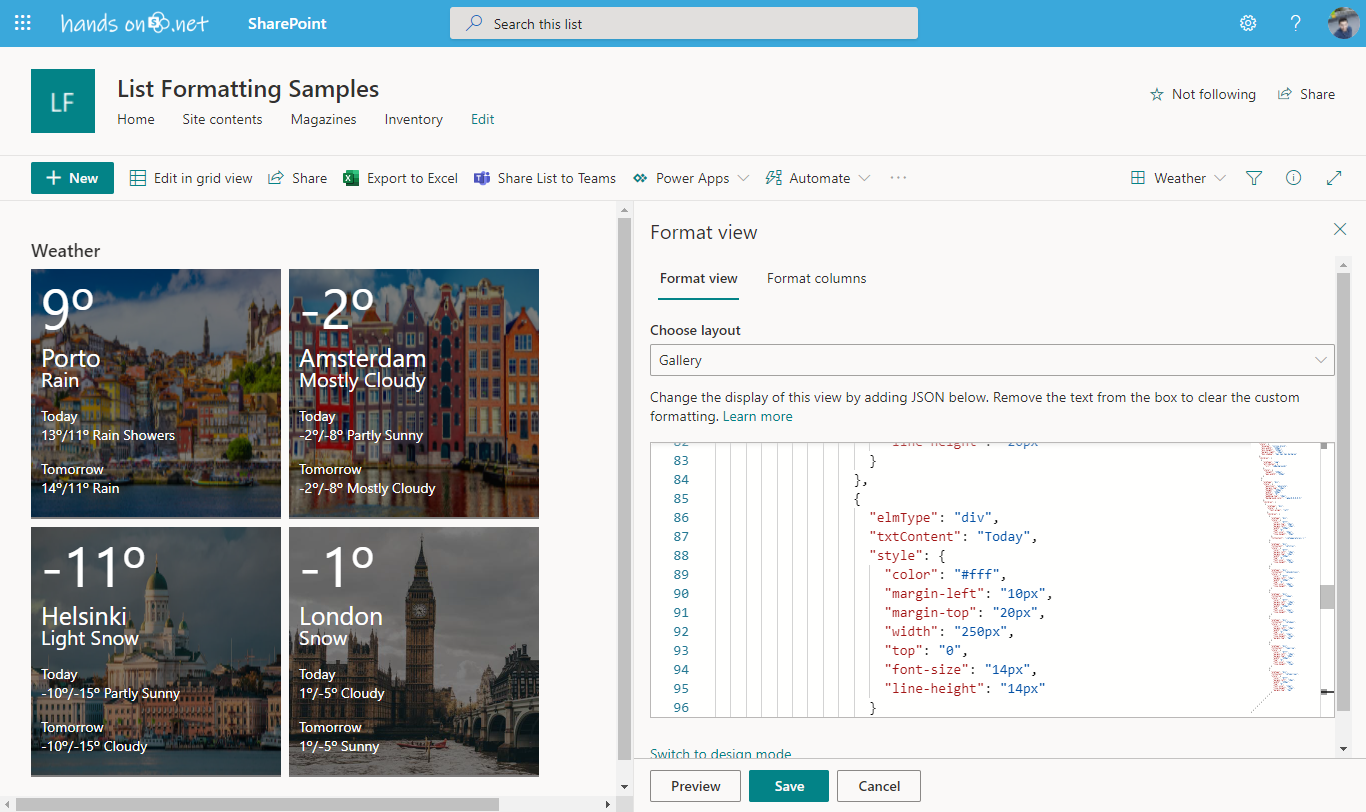
- Open the view selector and click on Format current view
- At the bottom of the format view pane click on Advanced mode
- Paste the following JSON in the source box
{ "$schema": "https://developer.microsoft.com/json-schemas/sp/v2/tile-formatting.schema.json", "hideSelection": true, "width": "250", "height": "250", "formatter": { "elmType": "div", "children": [ { "elmType": "div", "style": { "display": "inline-block", "min-width": "250px", "min-height": "250px", "margin-right": "10px", "box-shadow": "2px 2px 4px darkgrey" }, "children": [ { "elmType": "img", "attributes": { "src": "[$Background]" }, "style": { "height": "250px", "max-width": "250px" } }, { "elmType": "div", "style": { "position": "absolute", "margin-top": "10px", "height": "250px", "width": "250px", "bottom": "0", "padding-top": "10px", "background-color": "rgba(0,0,0,0.5)" }, "children": [ { "elmType": "div", "style": { "text-align": "left" }, "children": [ { "elmType": "div", "style": { "color": "#fff", "margin-top": "10px", "margin-left": "10px", "width": "250px", "top": "0", "font-size": "55px", "line-height": "55px" }, "txtContent": "=[$Temperature]+'º'" }, { "elmType": "div", "txtContent": "[$Title]", "style": { "color": "#fff", "margin-left": "10px", "margin-top": "10px", "width": "250px", "top": "0", "font-size": "25px", "line-height": "25px" } }, { "elmType": "div", "txtContent": "[$Condition]", "style": { "color": "#fff", "margin-left": "10px", "width": "250px", "top": "0", "font-size": "20px", "line-height": "20px" } }, { "elmType": "div", "txtContent": "Today", "style": { "color": "#fff", "margin-left": "10px", "margin-top": "20px", "width": "250px", "top": "0", "font-size": "14px", "line-height": "14px" } }, { "elmType": "div", "txtContent": "[$Today]", "style": { "color": "#fff", "margin-left": "10px", "width": "250px", "top": "0", "font-size": "14px", "line-height": "14px", "margin-top": "5px" } }, { "elmType": "div", "txtContent": "Tomorrow", "style": { "color": "#fff", "margin-left": "10px", "margin-top": "20px", "width": "250px", "top": "0", "font-size": "14px", "line-height": "14px" } }, { "elmType": "div", "txtContent": "[$Tomorrow]", "style": { "color": "#fff", "margin-left": "10px", "width": "250px", "top": "0", "font-size": "14px", "line-height": "14px", "margin-top": "5px" } } ] } ] } ] } ] } } - Click Preview to make sure the formatting is properly applied and then click Save
- Go to the view selector one more time and click on Set current view as default
Add the web part to a SharePoint page
The last thing you need to do is add your new list to a SharePoint page so all your users can see the new weather web part.
- Edit the page where you want to display the weather
- Add the List web part to the page
- On the web part select your weather list
- By default the List web part shows the list command bar, to remove it click in the edit properties button
- From the property pane toggle the option to Hide command bar
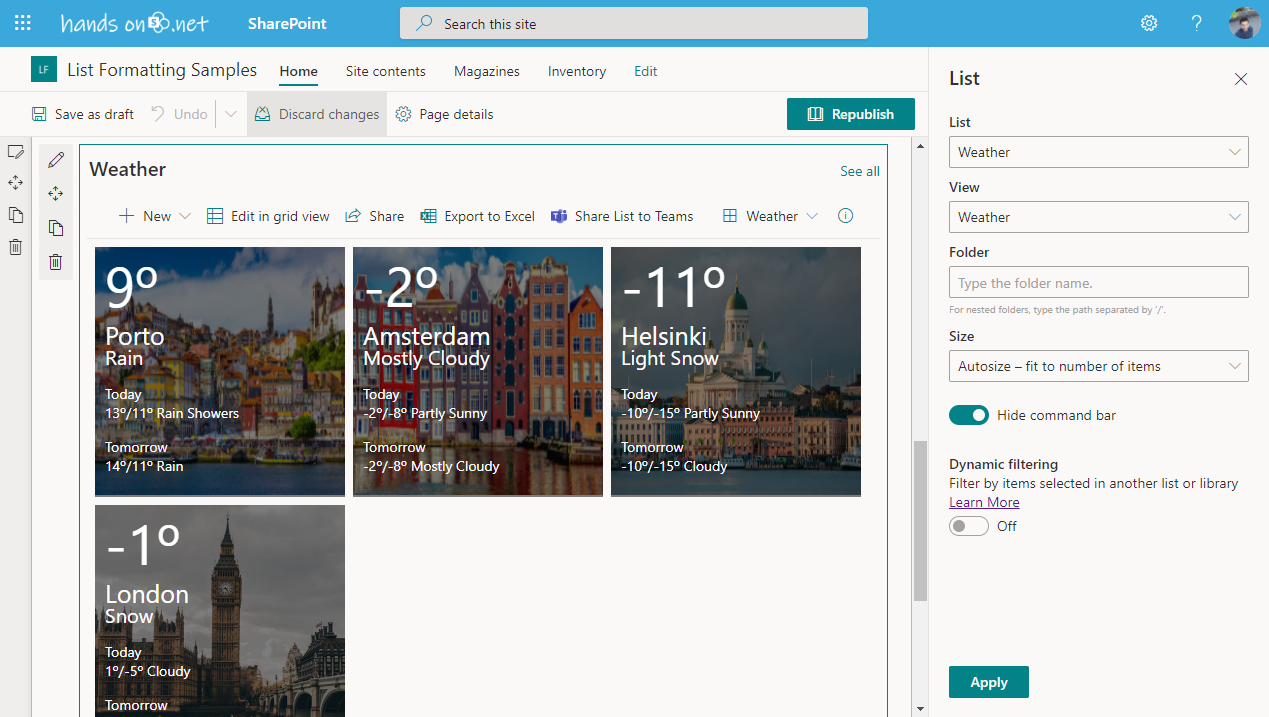
- Click on Apply and Republish your page
Your new weather web part is ready to be consumed by all the users and will be updated every hour, if you want to be more creative, I challenge you to modify the background image for the tile according to the weather conditions. 😊


February 8, 2021
Awesome post, thanks for that cool example! But as a Dutchie I do need to point out that you misspelled Amsterdam 😉
February 9, 2021
Hi Eduard,
Thanks for letting me know, took new screenshots to fix the error ♂️
Have a nice day 🙂
February 10, 2021
This is awesome!
What are the requirements for the background image? at the moment, the images I have used are not appearing,
February 10, 2021
For this particular scenario the image should be stored in a hyperlink or image type of column. (I did the setup for this post more than a year ago and the picture column was not a thing yet)
If you used a picture column type to store the image you must change line 22 in the formatting to
If the issue persists send me more information about the list definition and I’ll be happy to have a closer look.
Have a nice day 🙂