

 HANDS ON SharePoint
 HANDS ON Teams
 HANDS ON Lists
 HANDS ON tek
 M365 Admin
How to upgrade a SPFx project to the latest version in 3 simple steps
Back in December 2020 I’ve build a SPFx application customizer to easily deploy Microsoft Clarity on modern SharePoint sites using SPFx 1.11 and recently was asked to get it update to SPFx 1.15.
This was the perfect opportunity to finally write an article to explain how SPFx projects can be easily updated using Microsoft 365 CLI, here is how you can do it is 3 simple steps.

#1 – Install Microsoft 365 CLI
Using the CLI for Microsoft 365, you can manage your Microsoft 365 tenant and SharePoint Framework projects on any platform. No matter if you are on Windows, macOS or Linux, using Bash, Cmder or PowerShell, using the CLI for Microsoft 365 you can configure Microsoft 365, manage SharePoint Framework projects, and build automation scripts.
To install this masterpiece you can use NPM by executing the following command:
npm i -g @pnp/cli-microsoft365
It can also be installed using yarn using the following command:
yarn global add @pnp/cli-microsoft365
#2 – Get the upgrade report
CLI for Microsoft 365 does not change your project, instead it generates a report with everything that needs to be done to get the project moved to a higher SharePoint framework version.
To get the report for an existing project execute the following cmdlet in the project directory.
m365 spfx project upgrade --toVersion 1.15.2 --output md > upgrade-report.md
Open the upgrade-report.md using Visual Studio code to easily preview all the instructions to perform the upgrade, instead of executing each command manually I suggest you to scroll down until you find the Summary execute script section, this will perform all the updates at once.
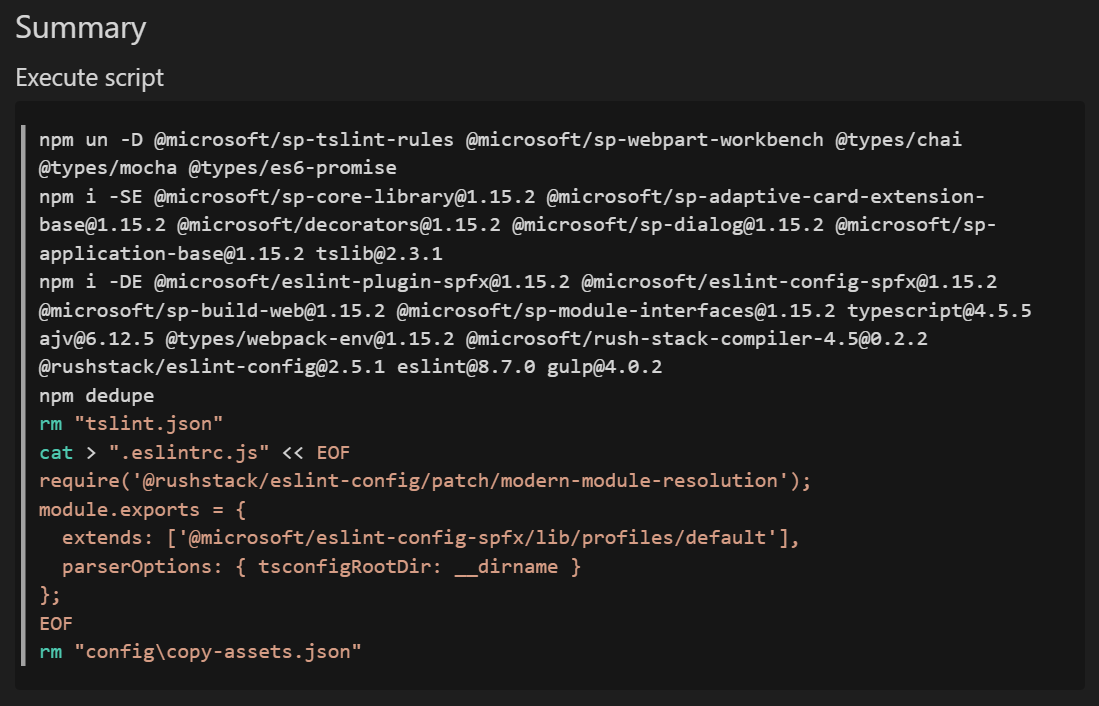
Once the script execution ends, continue to read the report file carefully and modify the all the files identified.
#3 – Delete the old node modules and install again
After updating the structure of the project, you now need to delete the node_modules folder and the package-lock.json to make sure everything is installed as if this is a new project.
Once all the files are deleted execute npm install to install all the node modules again.
With everything installed the only thing left to do is execute gulp serve to test that everything continues to work as before.
Common issues
Upgrading a SPFx project is a complex task and even with all the simplification M365 CLI does is not uncommon to run into issues, in this section you can find a few things that I run into and how I solved them.
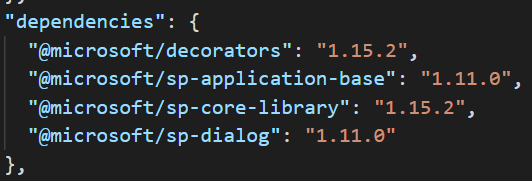
Duplicated dependencies
To avoid errors, make sure there are no duplicated dependencies in the package.json file, if you find some delete the one with the lower version.

Wrong node version
If you are upgrading from an older version of SPFx, most likely you will also need to change the node version running on your pc to make sure the packages installed are the correct ones.
If you find Microsoft dependencies in the package.json still referencing the old version you will need to move to the node version supported by the SPFx you are upgrading to, to check what version to use have a look to this awesome article from Hugo Bernier.
To run multiple node versions in the same machine and to switch between them have a look to this article.
Once you get the correct version of node running on your machine, execute npm install again.
Conclusion
Microsoft 365 CLI helps with SPFx solutions upgrade, but it’s a process that takes time and might throw you some curve balls that you need to fix to get everything working. The good thing is that you are not alone and a quick search on the internet will most likely get you the solution for the any issue you may face.


February 28, 2024
Just a small error in this (for me anyways)
This:
m365 spfx project upgrade –toVersion 1.15.2 –output md > “upgrade-report.md”
Should be:
m365 spfx project upgrade –toVersion 1.15.2 –output md > upgrade-report.md
Note the quote marks (“) are removed from around upgrade-report.md
February 29, 2024
Hi Ollie,
Thank you so much for the feedback. Already fixed.
Have a nice day 🙂