

 HANDS ON SharePoint
 HANDS ON Teams
 HANDS ON Lists
 HANDS ON tek
 M365 Admin
How to Take a SharePoint full Page Screenshot Using Microsoft Edge
Did you know that Microsoft Edge has a built-in feature to take screenshots of web pages? You can easily capture a full-page image of any web page with just a few clicks. However, there is a catch: this feature only works well if the scroll is in the body element of the web page. Unfortunately, this is not the case for SharePoint pages, as the scroll is placed in a different element. This means that the screenshot feature will only capture the visible part of the browser window, and not the entire SharePoint page.
But don’t worry, there is a workaround for this problem. In this blog post, I will show you how you can use a simple JavaScript bookmarklet to modify the SharePoint page and move the scroll to the body element. This way, you can use the screenshot feature of Microsoft Edge to get your full-page SharePoint images.

How to create the bookmarklet
A bookmarklet is a small piece of code that you can save as a bookmark in your browser and run on any web page. To create the bookmarklet that we need, follow these steps:
- Press CTRL + SHIFT + O to manage Microsoft Edge bookmarks
- Click on Open Favourites Page
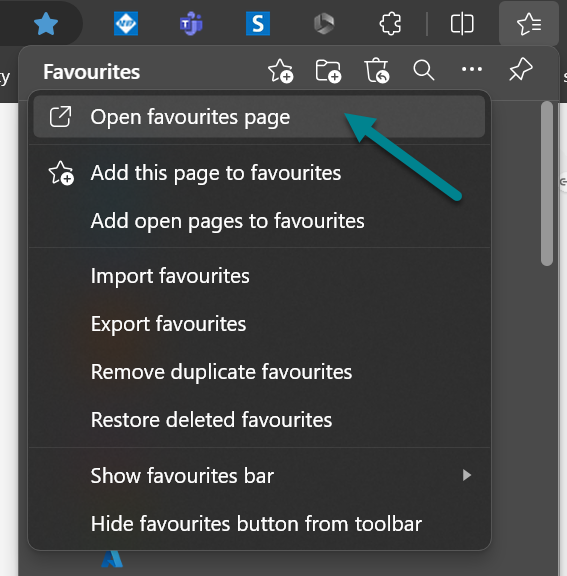
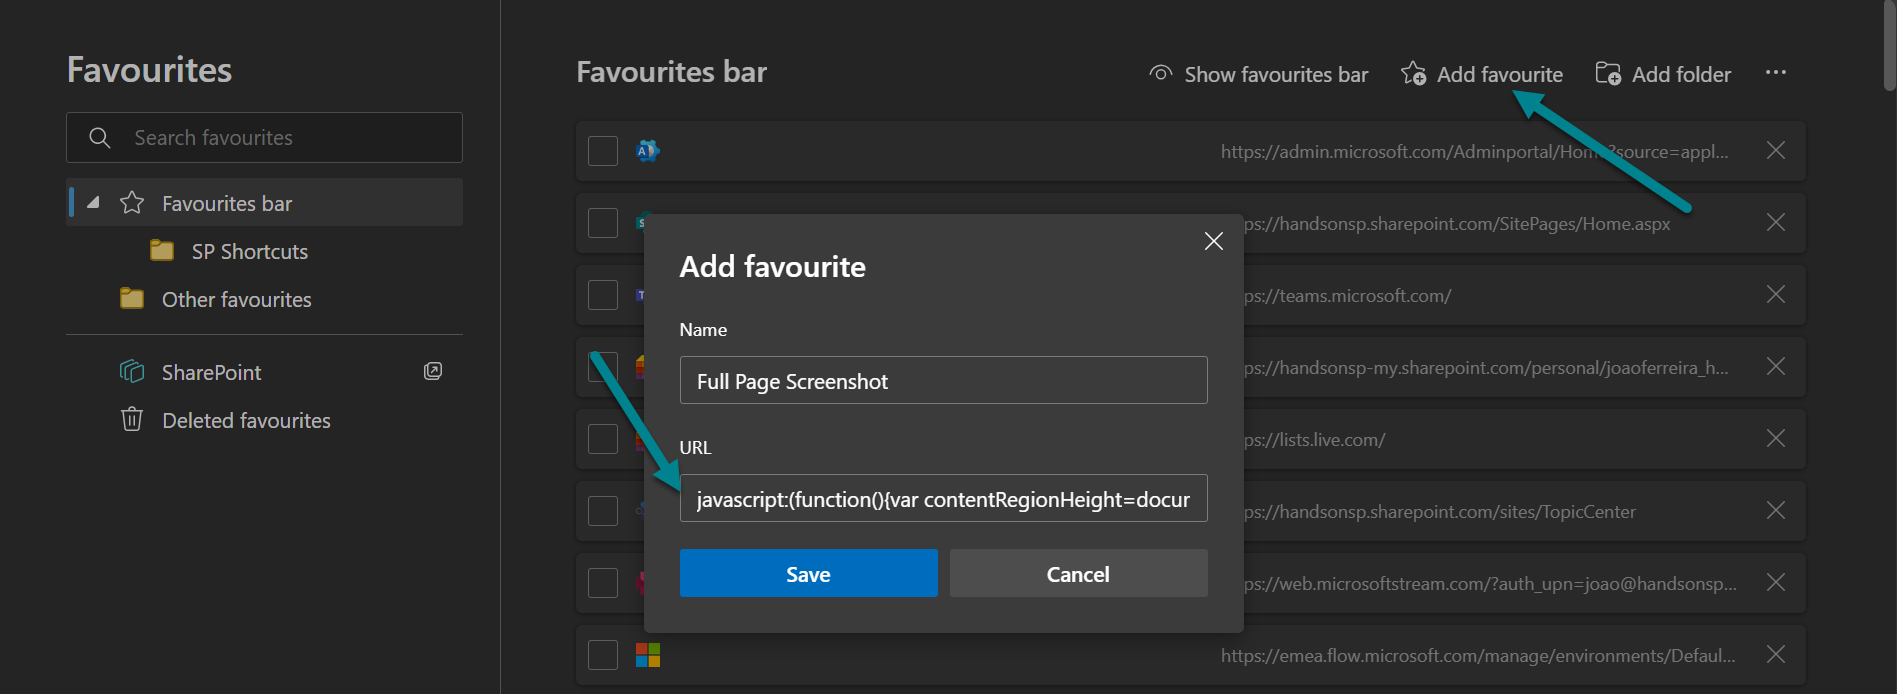
- Click on Add Favourite
- Provide a name for it, such as SharePoint Screenshot
- In the URL field, paste the following code:
javascript:(function(){var contentRegionHeight=document.querySelectorAll('[data-automation-id="contentScrollRegion"]')[0].clientHeight,scrollRegionHeight=document.querySelectorAll('[data-automation-id="contentScrollRegion"]')[0].scrollHeight,windowHeight=window.innerHeight,headerHeight=windowHeight-contentRegionHeight,bodyHeight=scrollRegionHeight+headerHeight;document.querySelectorAll('[data-automation-id="contentScrollRegion"]')[0].style.overflow="hidden",document.body.style.height=bodyHeight+"px",document.body.style.overflow="auto";}()); - Click on Save
How to use the bookmarklet
Now that you have created the bookmarklet, you can use it to take your full-page SharePoint screenshot using Microsoft Edge. To do that, follow these steps:
- Open the SharePoint page you want to grab
- Scroll to the bottom of the page to make sure all the web parts are loaded in the page
- Click on the bookmark you added to your browser to switch the position of the scroll
- Press CTRL + SHIFT + S on Windows or COMMAND + SHIFT + S on Mac OS to open the screen capture tool
- Click on Capture Full Page
You will see a preview of your full-page screenshot, which you can save, copy, or share as you wish.
Conclusion
From now on, every time you need to take a full page screenshot of SharePoint, you just need to click on the bookmarklet and use the Edge screen capture tool.
Please note that this uses DOM manipulation, and it might stop working if Microsoft changes the SharePoint pages. If this is no longer working for you, let me know in the comment section and I’ll try to fix it ASAP. If you want to try to fix it yourself here is the uncompressed version of the JavaScript that I built to change the position of the scroll.
var contentRegionHeight = document.querySelectorAll('[data-automation-id="contentScrollRegion"]')[0].clientHeight;

var scrollRegionHeight = document.querySelectorAll('[data-automation-id="contentScrollRegion"]')[0].scrollHeight;

var windowHeight = window.innerHeight;

var headerHeight = windowHeight - contentRegionHeight;

var bodyHeight = scrollRegionHeight + headerHeight;

document.querySelectorAll('[data-automation-id="contentScrollRegion"]')[0].style.overflow = "hidden";

document.body.style.height = bodyHeight+'px';

document.body.style.overflow = "auto";


February 7, 2024
Or do it the native way. – https://n8d.at/how-to-take-a-full-page-screenshot-of-sharepoint
February 7, 2024
You have always the best solutions Stefan.
Thanks for sharing. 😉
March 5, 2024
Thank you for taking the time to do this!
I looked at the native ‘solution’ given by Stefan Bauer but it was way more complex than this simple solution.
Thank you João!
March 7, 2024
Thank you Suzy,
I appreciate your feedback, if the solution provided in this article stops working let me know and I’ll try to get it updates ASAP.
Have a nice day 🙂