

 HANDS ON SharePoint
 HANDS ON Teams
 HANDS ON Lists
 HANDS ON tek
 M365 Admin
Stop wasting time duplicating Power Automate flows for SharePoint using Trigr from Encodian
With SharePoint Online you can easily create automations for lists and libraries using Power Automate, however this simple process can easily become out of control as more lists and libraries get created across SharePoint and Microsoft Teams.
For each new list or library where you want to get an automation applied, you need to copy or configure a new flow. This tedious and repetitive task is a waste of time and prone to human error.

With Trigr from Encodian you will be able to easily deploy the same flow across the entire tenant or selected site collections, using a SharePoint solution that allows you to reuse the same flow across different sources.
To better understand the power of this tool in this article you will see how the following scenario can be automated:
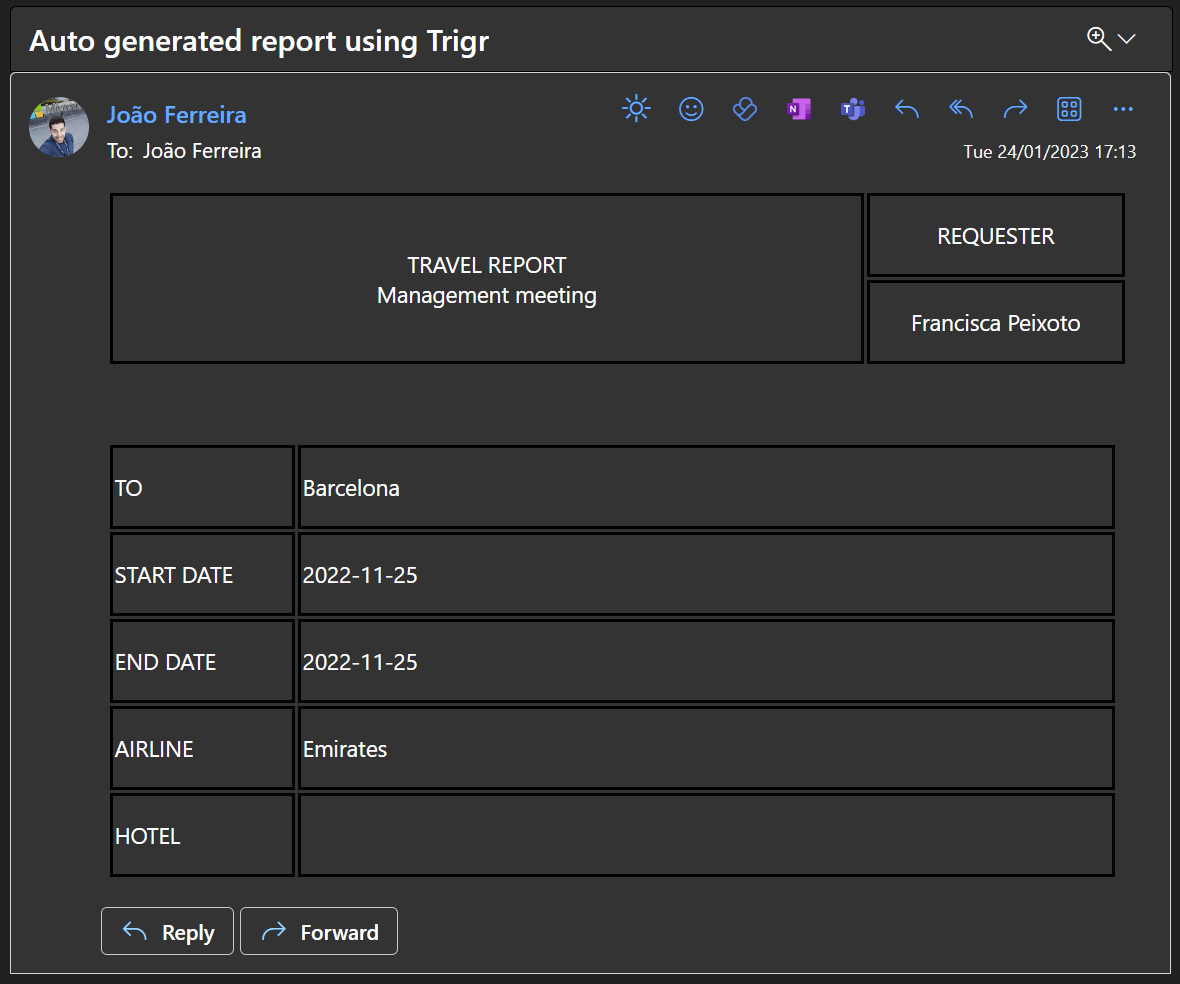
Hands-On tek is a company with several departments, each department manages its own travels and those get requested using a SharePoint list.
For convenience it was decided that each person should be able to get a travel report with the details of the trip including dates, flights and hotels by email.
This request must be made from the list directly, and it can be triggered by the person travelling or on his behalf by another team member.
What seems a simple scenario can become out of control easily with each department having its own list, without using Trigr this would require the duplication of the same flow, making it hard to maintain each time an update is made to the report.
Trigr comes extremely handy in a situation like the one described above where the same flow can be easily shared by all the lists in each department, in this article I’ll explain you how you can get Trigr installed in your SharePoint and environment and also how to implement the configuration for the scenario described above.
How to install Trigr in SharePoint
Trigger was implemented using the SharePoint framework and to make it available in all your lists and libraries it needs to be installed in your SharePoint tenant by doing the following:
- Start by downloading the Trigr SPPKG file from here, alternatively you can download it from the Encodian website here
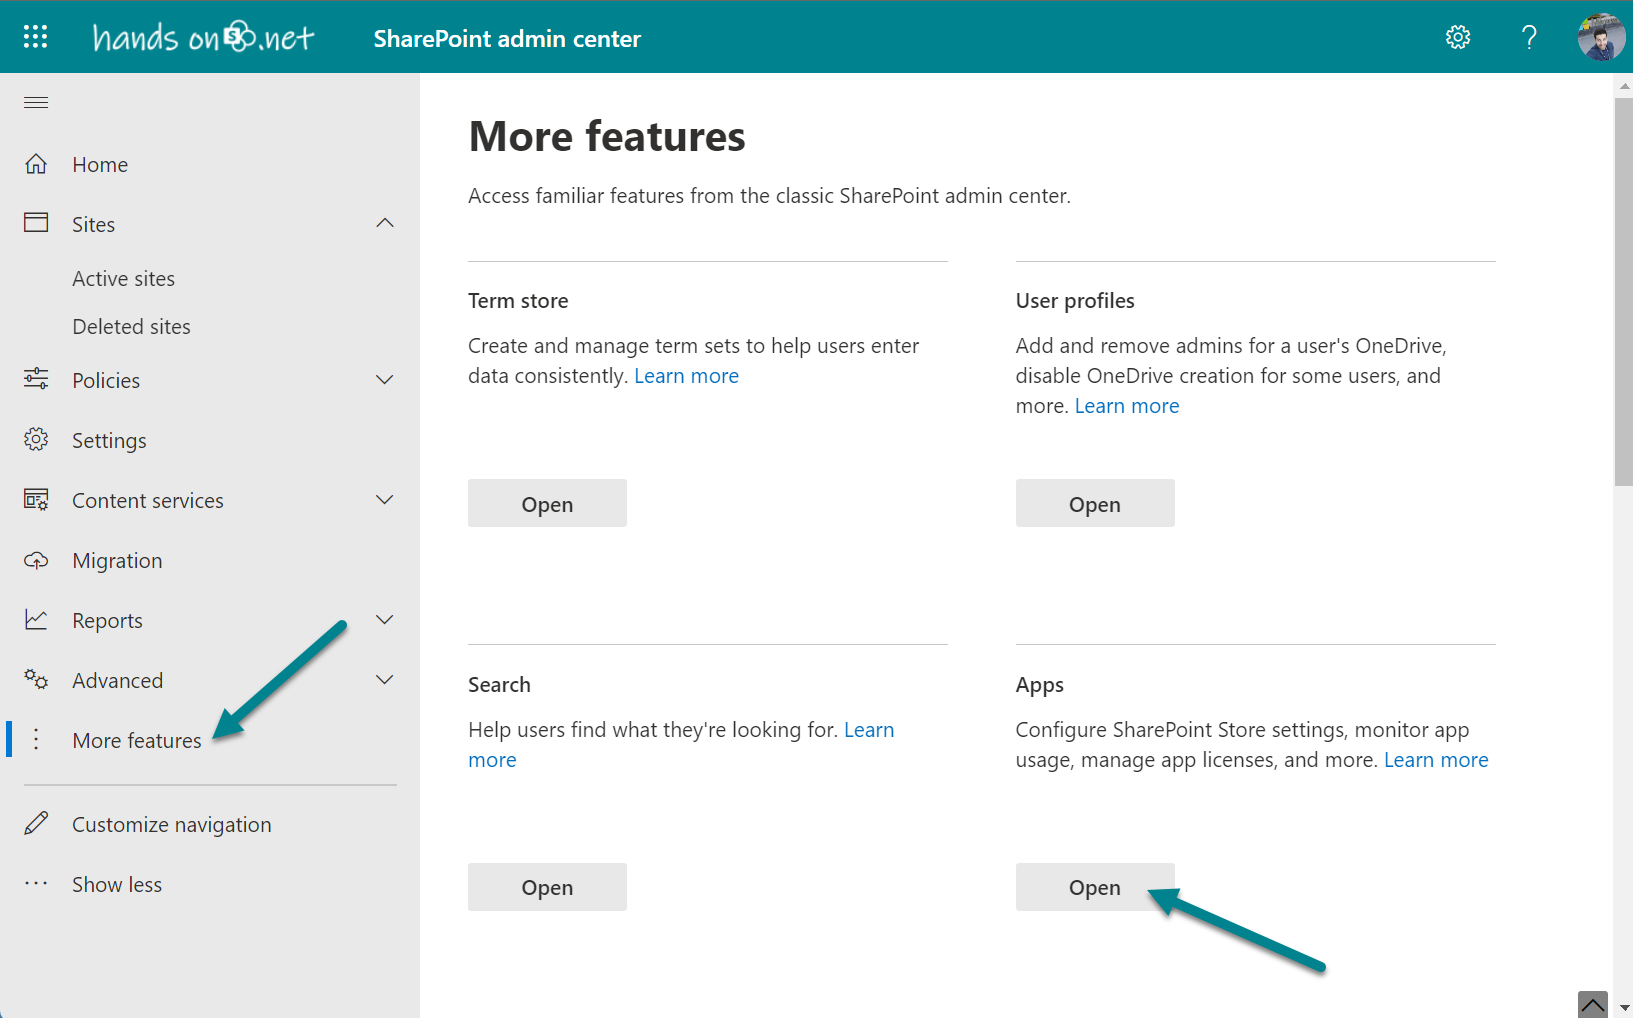
- Open the SharePoint Admin Center
- On the vertical menu click on More Features
- Look for the Apps section and click on Open
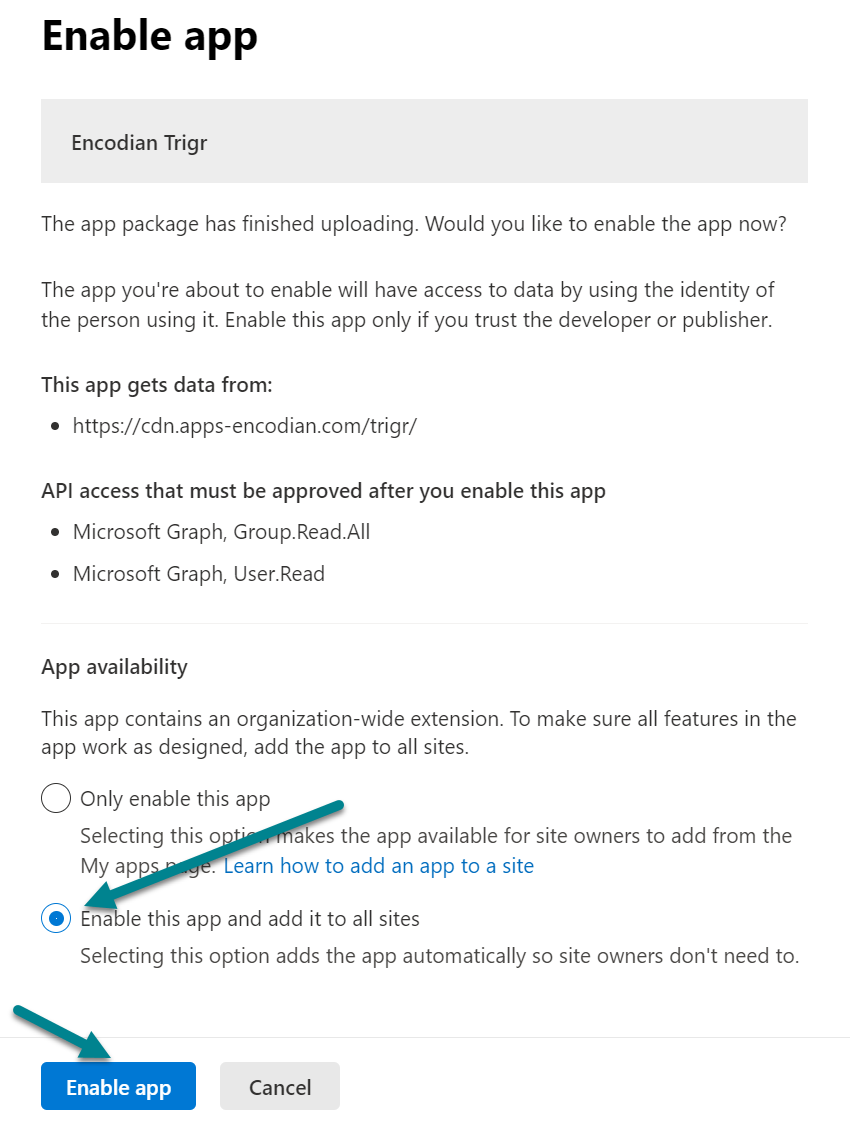
- Click Upload to install the downloaded SPPKG file
- Select the deployment option; for a tool like this and to get it available in all site collections I recommend you to select ‘Enable this app and add it to all sites’
- Click in the Enable App button
- Once deployed it will request the approval of two Microsoft Graph permissions, click in the Go to API access page to view the permissions
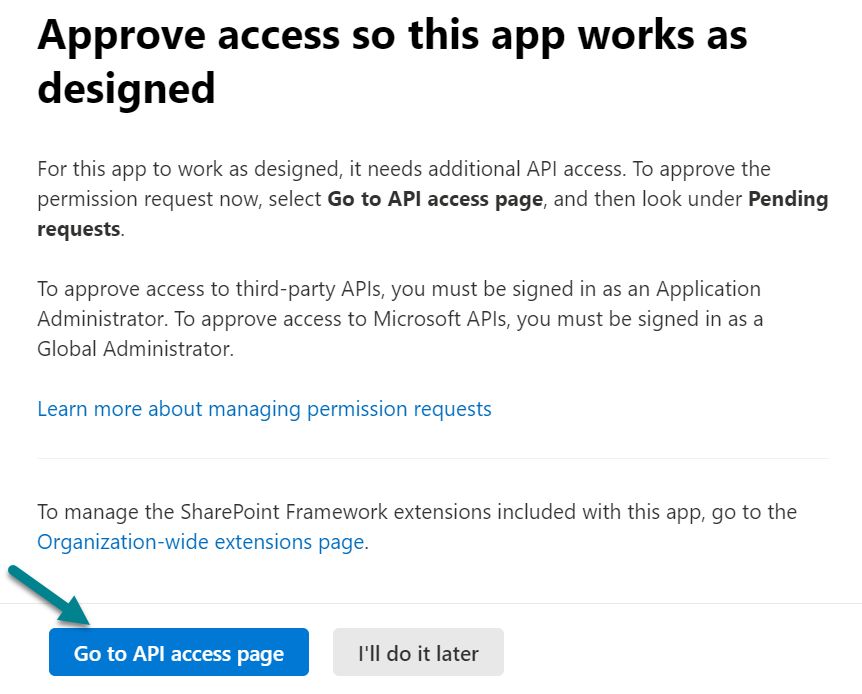
- If not approved yet select the following permissions and approve them
- Microsoft Graph, Group.Read.All
- Microsoft Graph, User.Read
Once the installation steps are completed the Trigr solution will be installed in your environment and ready to be used, however it will not display yet any actions. To start configuring Power Automate flows and Trigr actions move to the next section.
How to create a Power Automate flow for Trigr
To start building your automation for SharePoint lists and document libraries you will need to get your API for Trigr, from the Encodian site and then implement the Power Automate flow. To accomplish these configuration do the following:
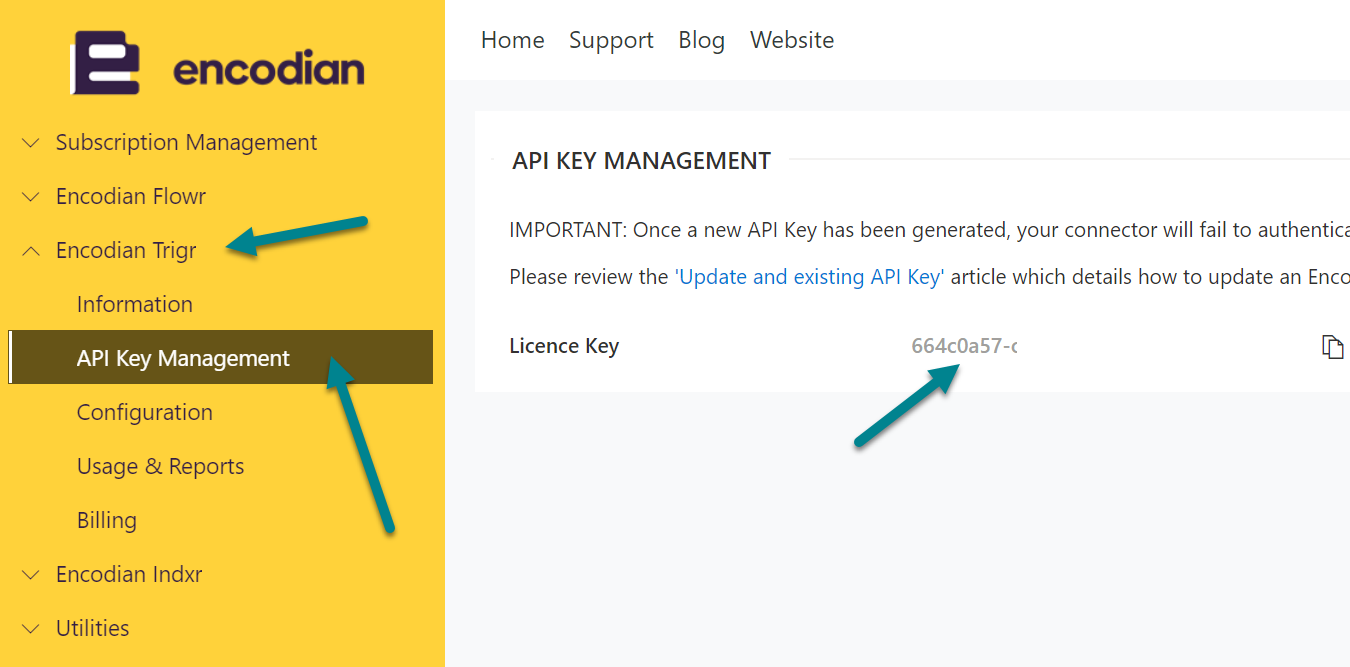
- Access your Encodian personal account here
- On the vertical menu expand the Encodian Trigr and click in API Key Management
- Copy the License Key value
- With the API Key in your clipboard click here to open Power Automate
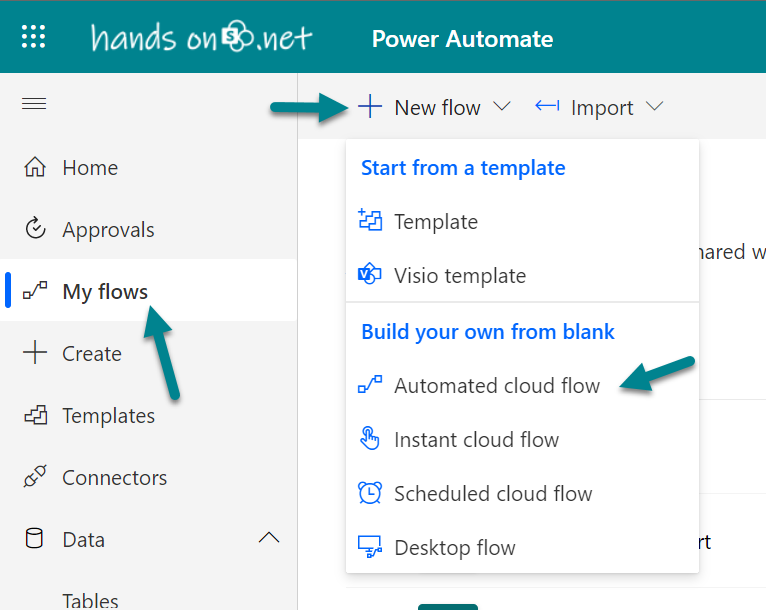
- In the vertical menu click in My Flows, and then New Flow
- On the new flow menu, click in Automated Cloud Flow
- Provide a name for your flow
- In the flow’s trigger search box type Encodian, and then select When a user runs a Trigr
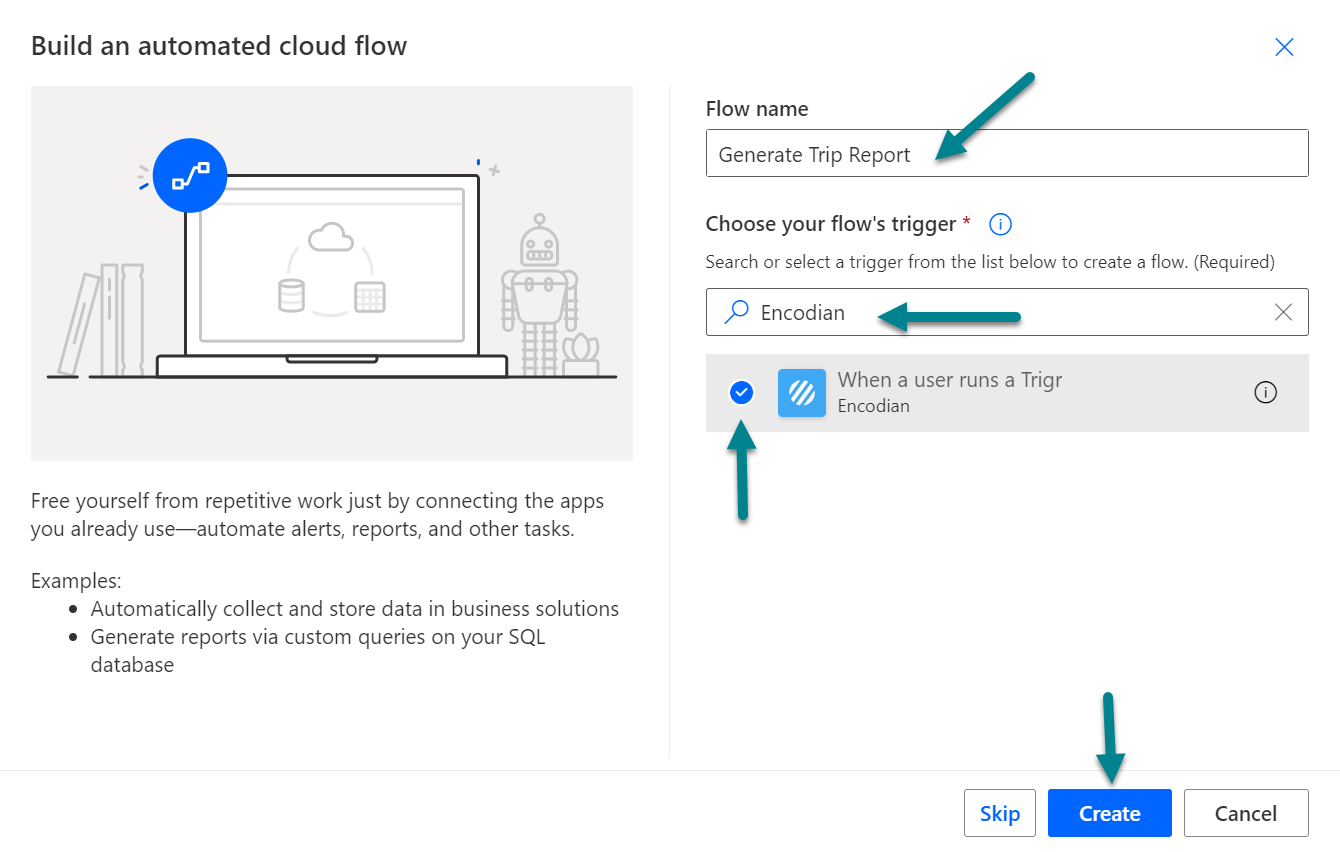
- Click in the Create button
- In the flow builder screen, the first thing you will need to do is establish a connection to Encodian; provide a name for the connection and past the API key
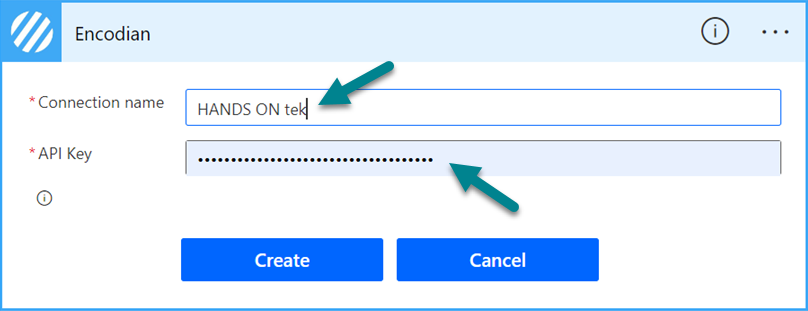
From this moment on you will be able to use your Encodian API key in other flows, without copying key and defining the connection for each one.
Important ⚠️
The data from the “When a user runs a Trigr” trigger action is dynamic, so values are unavailable until runtime. With this Power Automate limitation in mind define your flow using a static site and list and after running the first test switch it to the dynamic values from Trigr.
With the scenario defined in the beginning of the article in mind let’s now create the flow for to generate the reports and send them by email.
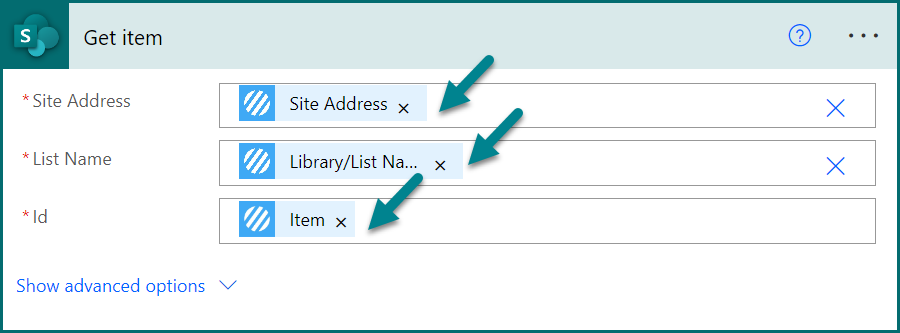
- Add the SharePoint Get Item action and select the Site Address, List Name and Id from the Encodian Trigr
- To get the email of the user who will receive the report by email, you need to parse the information introduced by the user in the Trigr form, to do it add the action Parse JSON
- In the content select the Form Field form Trigr, and use the following schema to capture the email
{
    "type": "object",
    "properties": {
        "Email": {
            "type": "string"
        }
    }
}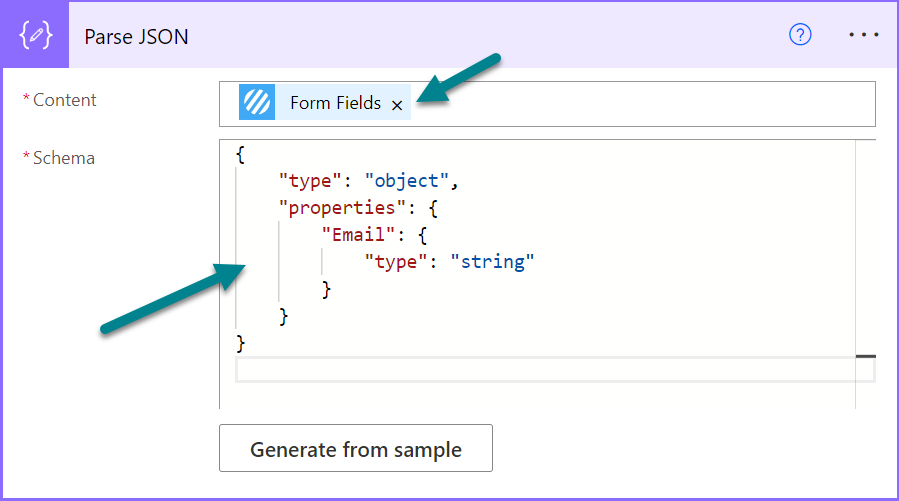
- Add the Send an email (V2) action
- Add the Email value to the To text box, type the subject for the email and create the body. To access the item fields from the Get Item action you can use the following formula adjusting the name of the columns
outputs('Get_item')?['body/Title']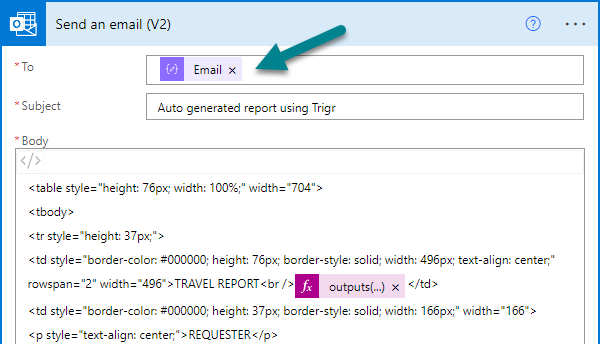
Save your Flow and move to the next section to learn how to create an action using Trigr to generate a travel report from each one of the travel lists.
How to configure Trigr actions
To start configuring Trigr actions, you will need to use the Encodian portal form where you will be able to define them for the lists and libraries. From the portal you will also be able to create a custom form for the action, and restrict the use of each action by Activity directory group or SharePoint site.
With the example described in the beginning of the article in mind, to implement the action for the travel lists you should do the following:
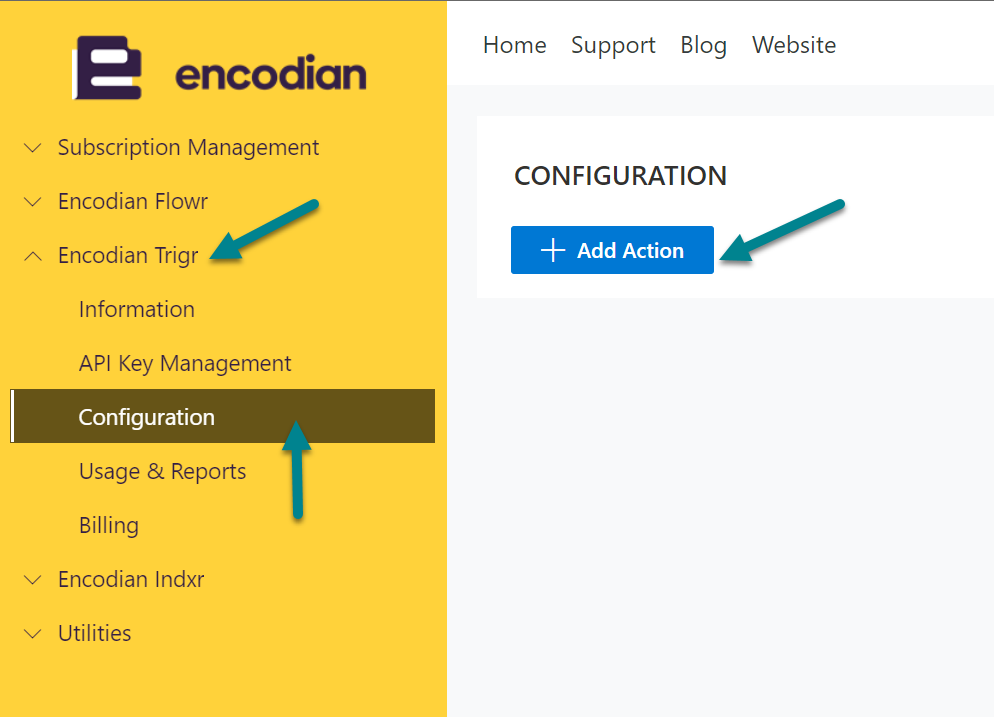
- Access your Encodian personal account here
- On the vertical menu expand the Encodian Trigr and click in Configuration
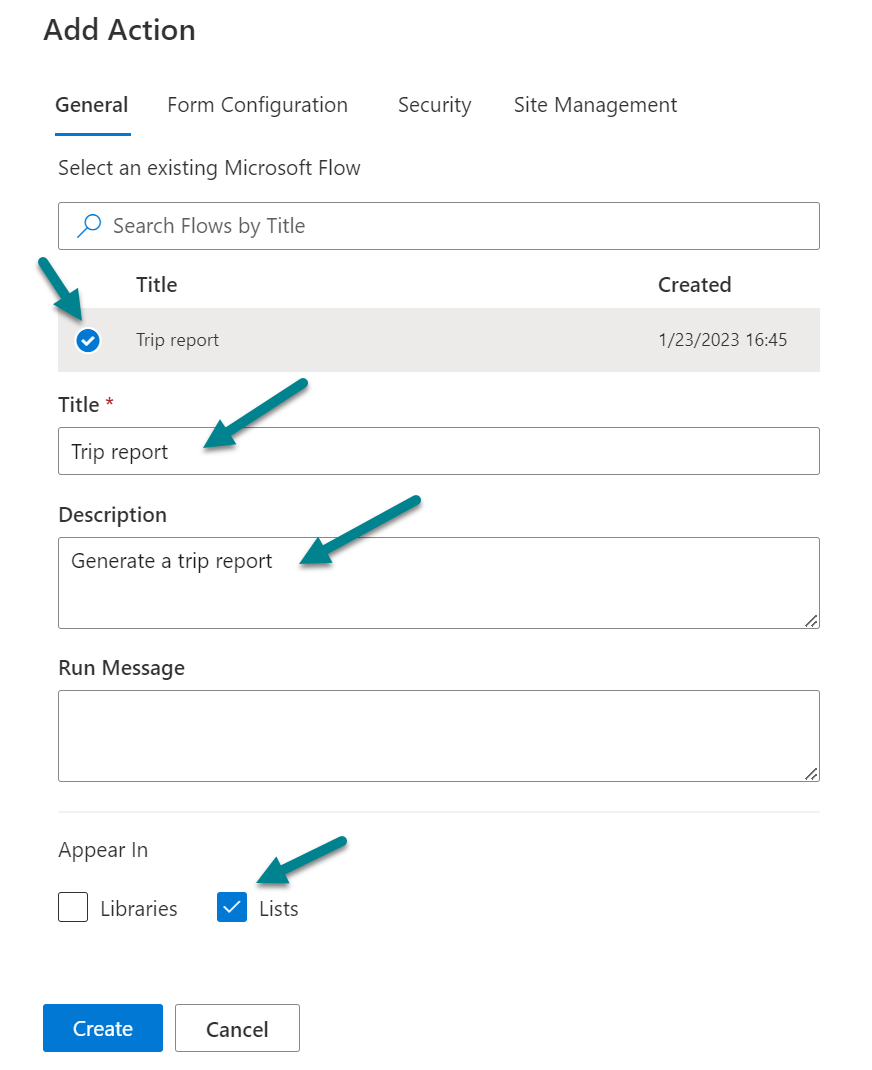
- Click Add an Action
- Provide a Title for the action and optionally a Description and a Run Message
- Select the from Power Automate that you want to execute for this action
- Choose where it should appear, you can define it to be visible in Lists, Document Libraries or in both types
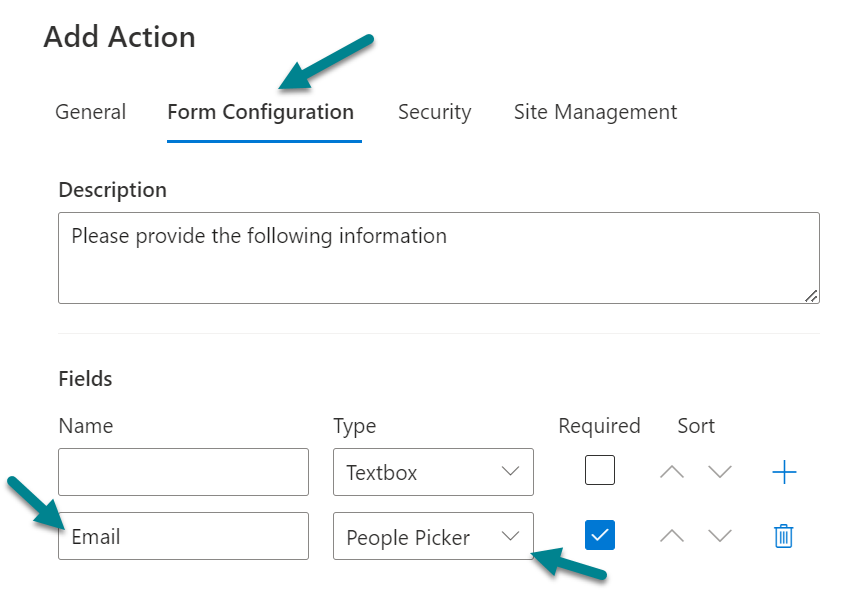
- One of the requirements was to send the travel report by email, to implement this feature click in the Form Configuration tab
- Is not mandatory, but to provide a good user experience I recommend you write a brief description for the form
- In the Fields section, type email as the name of the section and select People Picker as the Type
- Click in the + icon to add it to the form
- If you want to restrict the use of the action inside the your tenant have a look to the Security or Site management and configure it according to your needs
- Click in the Create button to save your new action
After completing this process you are ready to start using Trigr in your lists, to see how it works move to the next section.
How to create a flow using Trigr
With all the configuration in place, the last thing we need to do is take advantage of Trigr directly from Microsoft Lists or SharePoint Lists by doing the following:
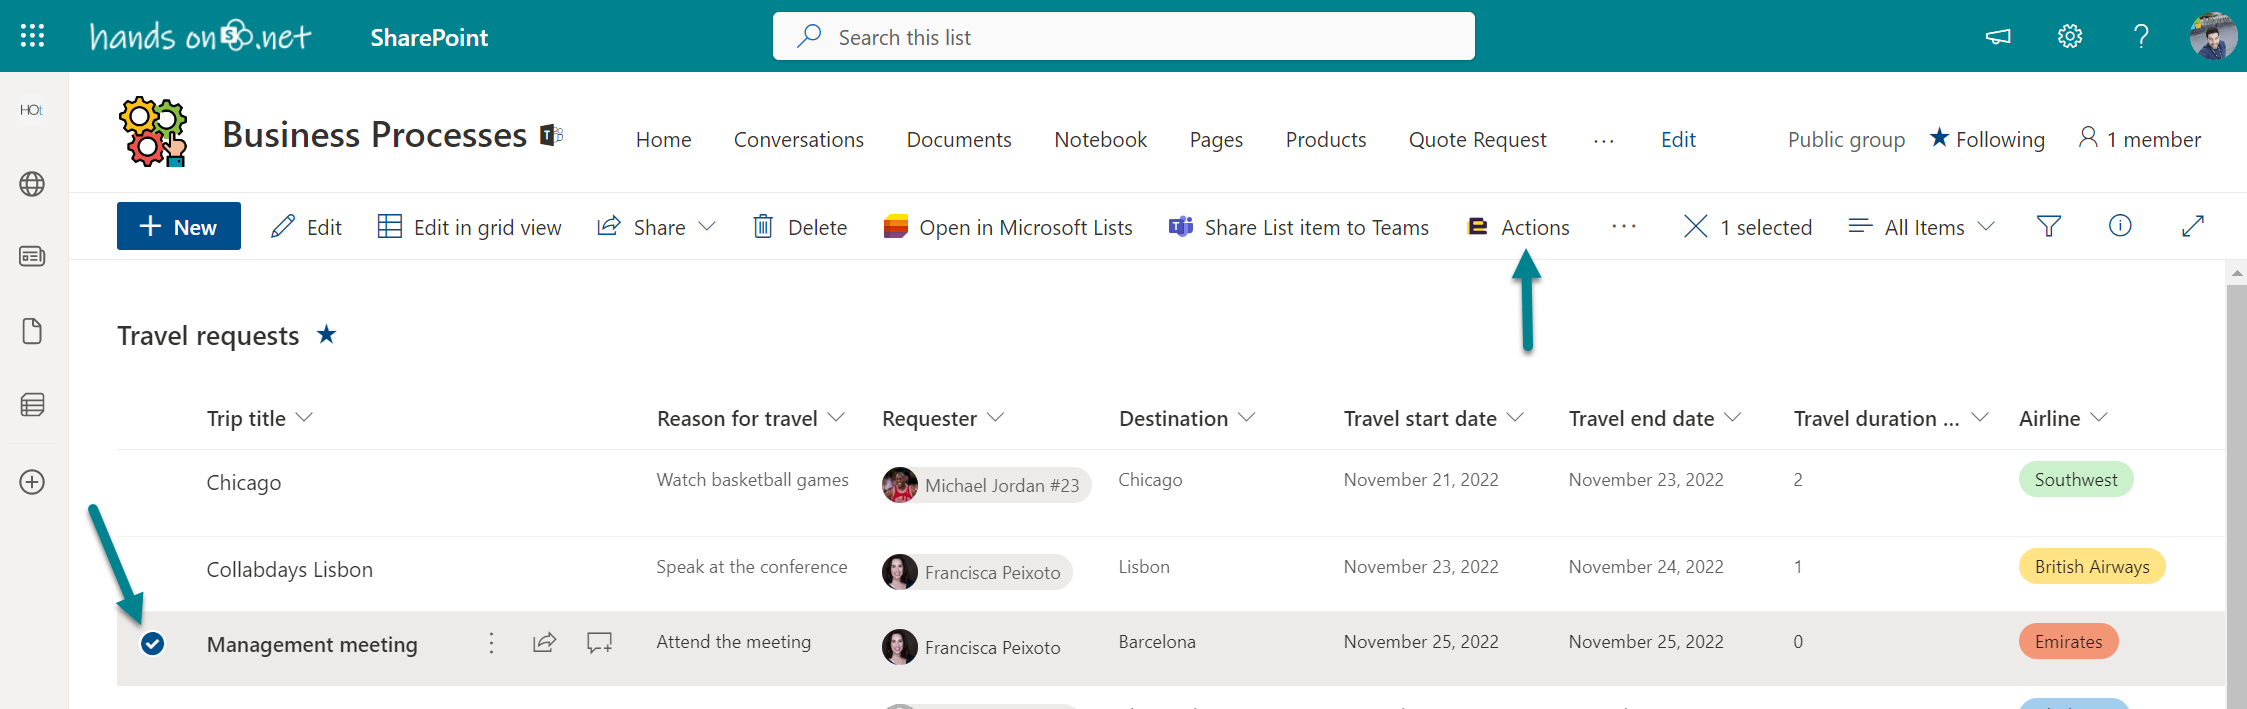
- Select the list item where you want to execute the Trigr action
- From the list toolbar click in Actions, you can identify it by the Encondian logo
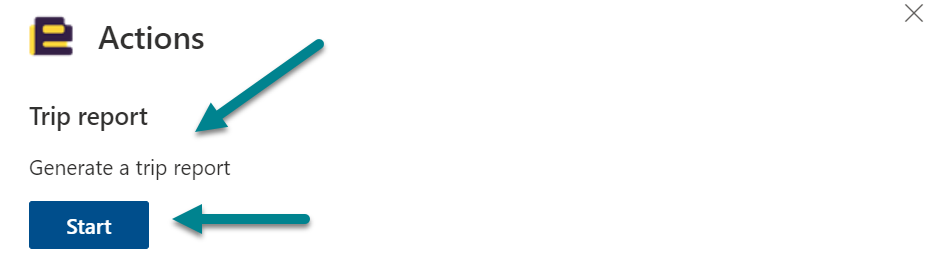
- Look for the action you want execute for the item and click on Start
- Fill the Trigr form with the required information
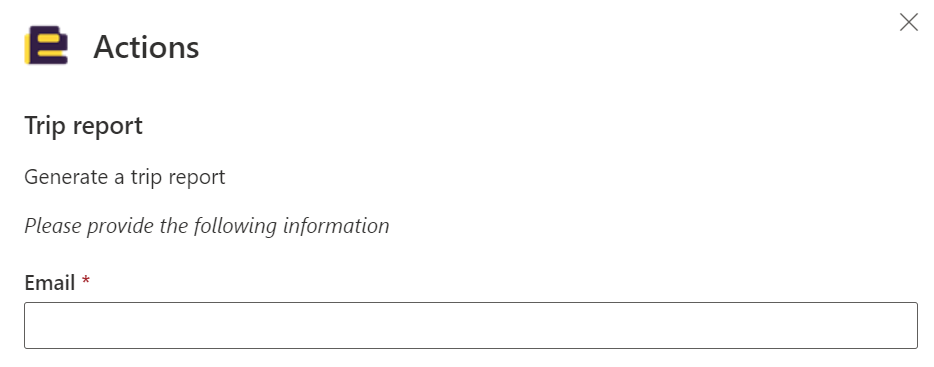
- Click Submit
The execution of the flow starts immediately and just a few seconds after the submission the user receives an email with the trip report.
This fairly simple process can now be applied to all travel requests lists in all departments and each new version of the report only needs to be updated in one location.


No comments yet